

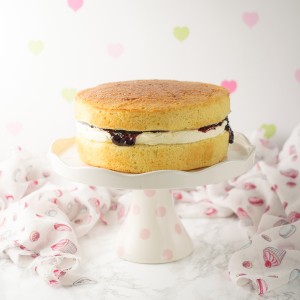
It was a long old time ago that I came up with my Vanilla Yogurt Cake. It was back when I still hadn’t conquered the Victoria Sponge (like a lot of apparently simple things, to do it spot on takes quite a bit of practice!) and what the new cake delivered was a well risen, golden sponge with the extra bonus of being very vanillary and it had a beautiful soft moist texture thanks to the yogurt.
It’s worth pointing out that I use Greek yogurt and my own vanilla extract, not vanilla flavoured yogurt which is too thin and has lots of extra sugar in it. As it stands, it makes an excellent teatime treat and I do urge you to go check out the original recipe I posted two and a half years ago now.
However, what I want to talk about today is how I took this recipe and developed it into a cake good enough to be made into a multi-tiered, naked wedding cake. And how to adapt it to become dairy free, should you need it to be so. Go grab a cuppa – this one is going to be a long one!

A lot of readers have contacted me in the intervening years since publishing my Vanilla Yogurt Cake asking how to adapt it into celebration cakes of various dimensions. It’s really popular come birthday time, I mean, who doesn’t love vanilla? I’ve made upwards of a hundred of them now, throwing in an extra egg, more or less yogurt, more or less flour to meet the specific needs of the particular occasion so I feel confident in saying you can trust this finished recipe.
What follows is similar to the original but I found a richer cake, with a higher proportion of sugar made for a better texture and colour to the final bake, especially when you are making a naked cake which needs a consistent appearance as there is only so much icing sugar you can cover imperfections with! Also, and perhaps the most key recipe change, is the type of flour and amounts of raising agents I use.
Back in the beginning, I used a 50:50 blend of plain to self-raising flour also with extra raising agents. It was a nod and a wink to The Primrose Bakery cupcake recipe I used for my own wedding cake (a tower of amaretto cupcakes with a 6 inch layer cake to top it) but after a lot of tedious maths and more stress than you need when making large celebration cakes, I sat down and worked out the overall proportion of both baking powder and bicarbonate of soda needed if you only use plain flour. So much simpler – apologies for ever giving such a high maintenance sort of recipe!
Here’s me and Hungry Hubby and The Cake on our wedding day almost 6 years ago ♥♥♥ …
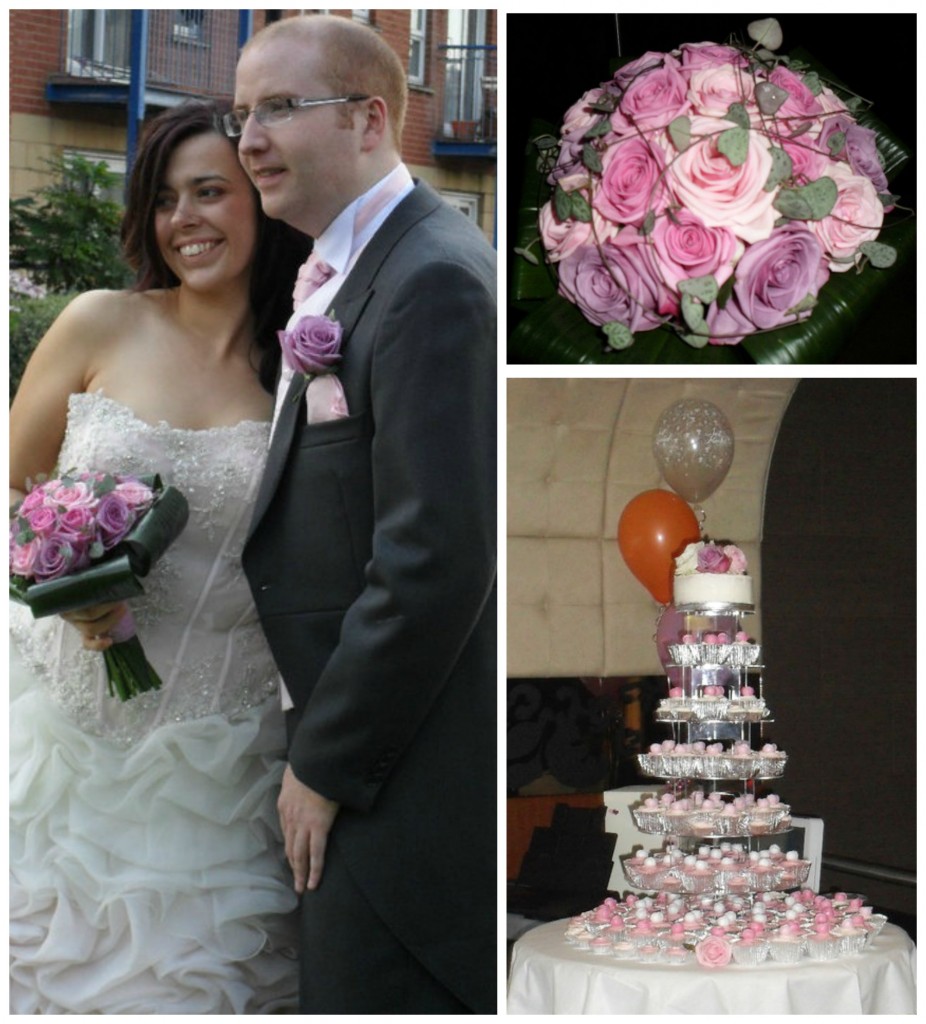
If we were to get married again today, the naked cake look is definitely the way I would go too – I can totally see why our friends have asked me to make them a tower of sponges filled with soft and fluffy buttercream and decorated very simply with seasonal berries.
I’ve never been a fan of sugarpasted cakes as the sugar paste is purely decorative (in my opinion) and therefore gets peeled off and discarded as you eat. With a naked cake, the whole thing is utterly delicious, especially with extra berries on the side to serve. Rustic, homely and inviting – why wouldn’t you want to serve that to your wedding guests?
There are a few points to bear in mind when planning such a wedding cake mind you, as it doesn’t have the keeping qualities of a sugar pasted rich fruit cake that is actually better made month in advance. Assuming you are a home baker like me, making this cake for a friend or yourself (if you are superwoman!).
Here we go:
-

- 2 inches size difference between tiers
-
- 3 inches size difference between tiers
-
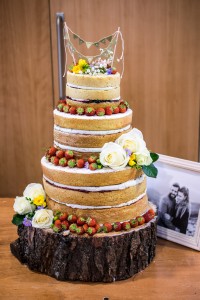
- If you want fruit on the layers, you will need a minimum of 3 inches difference per tier or you will be lucky to fit a blueberry and a few currants on the exposed cake. 3 inches overall means only 1.5 inches around the cake, if they are stacked directly on top of each other. The cake on the left (pictured above) is stacked with one cake centred immediately over the other – the cake on the right is stacked towards the back, giving a bit extra space around the front to pile on fruit and flowers.
- Both brides wanted a good thickness of sponge and the overall look to be “tall” for their wedding cakes. Odd numbers look best but I would say, if you went up an inch to 4 inches size difference per tier to give even more room for the decorations, then I would be tempted to split the sponges in half and have 6 layers of cake per tier to give the height needed, or it would become quite short and stocky looking – never good on your wedding day!
- This is crucial – don’t just talk to the happy couple about their cake, speak to the venue directly yourself, well in advance, even at the planning stage. You need to know where the cake is going to be set up and if it will be moved during the course of the day, other than when they slice and serve it. The dowels will offer support to the cakes but any fruit and flowers are placed on the cake, so will shift if the cake is moved (unless they have it on a trolley which can be wheeled rather than recruiting half the wait staff to lift a precarious 50kg display cake!). If moving it is essential for the venue, I urge you to think twice about the decorations especially if you won’t be there to correct any slips as they happen.
- Befriend your local grocer and tell them you need fruit worthy of display, to be picked up the morning of the wedding. Order extra to allow for spoilage – I would get 25% more than you think in case of doubt. The surplus can be served alongside the cake by the venue (or take it home and make some jam). If you are in Sheffield, I can’t recommend Beanies enough – they have never let me down and the fruit is both beautiful and very flavourful to eat.
- Allow a day just to bake the cakes – it took me pretty much 8 hours of solid baking to make the last one I did as I timed the mixing of each lot of batter so as one cake finished baking, I could get the next in the oven. I have done this around my day job previously but it was infinitely less stressful to take the day before the wedding off, having scrubbed the kitchen, oven and all my cake tins, prepped the kit I would need and done one last stock check two days before.
- With regard to the baking – and I’ve said this before – get an oven thermometer. They are super cheap and will revolutionise your bakes. This one is the one I have and trust: Master Class Wireless Stainless Steel Oven Thermometer
. Be wary that opening and closing the oven will affect the temperature within so do avoid unnecessary door opening plus domestic ovens can be imprecise when kept on all day. It’s a pain but checking the dial through the door (if yours is glass) is well worth it at frequent intervals.
- Once baked, cool in the tin for 10-15 minutes then place on a rack the right side up until stone cold. I lightly cover with a clean tea towel to prevent the surface drying out whilst they cool. Wrap in clingfilm and leave somewhere cool until the next morning. They must be stone cold first or they will sweat.
- I like to make the jams myself which I do weeks in advance and store in sealed, sterilised jars. The baking has to be done as close to the day as possible – the day before is ideal, two days at a pinch (it’s a wedding – you want the cake to be at it’s very best so it’s worth the extra effort). But know that this cake has excellent keeping qualities and will be delicious up to 5 days after (i.e. if you have overestimated the amount needed, the family can take a tier home and it will be good for a few days after; this is a cake that keeps on giving!). The morning of the wedding is when I fill with jam and buttercream, dowel the tiers and then drive them to the venue to assemble and decorate on site. An extra pair of hands in the car with you would lessen the stress of transportation. And yes, it will be an early, early start!
- When at the venue, the first thing to do is lay all the fruit and any flowers out on lots of kitchen roll to dry them off. The industrial fridge my grocer has means there’s quite a bit of condensation on the fruit so bringing them to room temp, drying the surfaces out and also getting rid of any spoiled ones is essential.
- I much prefer wooden cake dowels which don’t slip when transporting such a cake like plastic ones can – sugarpasted cakes are more solid and less likely to slip around. I place them at the 12, 3, 6 and 9 o’clock positions, 1-1.5 inches in from the outer edge of the cake to be placed on top. A top tip is to cut a circle of paper (any will do, the thinner then better) and place it on the lower cake, exactly where you want the next tier up to go. Mark the positions in pencil then push the dowels though. I cut them with pliers for a nice clean cut. I use these: PME Bamboo Dowel Rods, Pack of 12

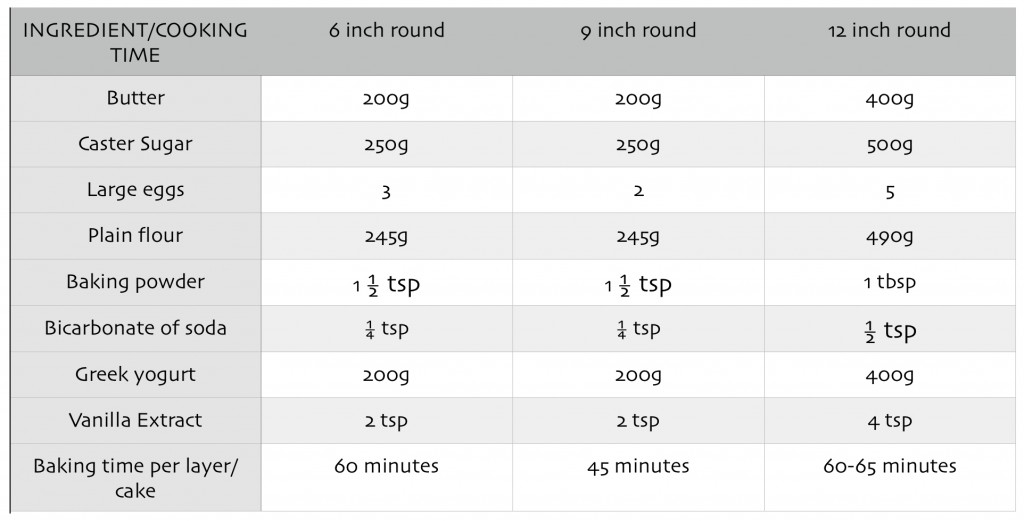
Now to the bit I think my cake maker friends (like Mel and Caroline) have been waiting for – the amounts you need and the time each layer of cake takes to bake. I should point out by “layer” I mean each individual sponge and by “tier”, I mean assembled layers of the same dimensions with their jam and buttercream. I have found baking the 6 inch cake all in one and slicing it produces a better finish and is less work than making three very small mixes, but all the other sizes I make, I bake one layer at a time for best results.
Notes:
- I cut bake one very tall 6 inch cake using a deep tin lined with a very tall collar of baking parchment lined foil. I slice it into 3 once baked. All other sizes, I bake the layers individually.
- Yes, I use less egg for the 9 inch even though it is otherwise the same as the 6 inch recipe. You can use 3 small eggs if you have them in but 3 large ones makes it too eggy and risks it rising then falling on baking.
- The stated times are a guide but I find them remarkably accurate in my oven with my thermometer – start checking for doneness 10 mins before and be adaptable (and don’t forget to write it down so you know how long each layer needs in your oven).
- For the raising agents, all measures are levelled off, flat teaspoons.
If you want to make this a dairy free cake, then after many trials I found using Alpro Soya Yogurt in place of cow’s milk Greek yogurt worked very well and as for the butter, I like to use Pure Dairy Free Spread. Old fashioned English bakers will be familiar with ‘baking marge’ and will know how reliable the rise is – you can see in the photos of the two wedding cakes side by side above that the one on the right is very even, the colour is the same on each layer and the texture very regular. This was the dairy free version.
You cannot substitute the flavour of butter but if eating it will make the happy couple ill, then there is no choice but to use these dairy free substitutes. A way to bump up the flavour is to use real vanilla, measured generously (scrape the seeds out of a pod) for the cakes and the buttercream, as well as making the jam yourself as store bought versions do not compare to the real deal. When eaten together, you will have one delicious cake.
A lot of vegan recipes use coconut based products but as most of the people in my life tend to actively dislike the flavour of coconut, these vegetable oil based products are the next best thing.
Making This Cake Dairy Free
To make dairy free buttercream, I use half solid Stork (which is dairy free – the soft version in a tub uses buttermilk) to half Trex in the place of the usual butter. With these solid-at-room-temperature vegetable fats, you have far less risk of splitting as you beat them together with the sugar, plus for such a large cake, the buttercream must be solid or it will run out under the weight of all that cake and fruit. I use a little unsweetened almond milk to give a slightly softer, fluffy texture (use the rest in your smoothies) plus I use vanilla powder
as I found adding vanilla extract can split dairy free buttercream as you mix it in.
And one final tip before you get the recipe – a dish of water in the bottom of the oven provides a little steam and helps with the rise and colouring of the cake. Trust me, it’s the small things which all add up to making the perfect wedding cake.
- 200 g softened butter*
- 250 g caster sugar
- 245 g plain flour
- 1.5 tsp baking powder
- 1/4 tsp bicarbonate of soda
- 3 large eggs
- 2 tsp vanilla extract
- 200 g Greek yogurt*
- 100 g soft butter**
- 200 g icing sugar
- Optional - 2-3 tsp milk unsweetened almond if going dairy free
- 3-4 tbsp jam of your choice
- 1 tsp vanilla extract or vanilla powder if making this dairy free - see notes
- Icing sugar
- Oven thermometer essential!
- 6 and 9 inch cake boards 2mm thick
- 12 inch cake drum about 8-10mm thick
- 6, 9 and 12 inch cake boxes
- 8 wooden dowels
- Large piping bags
- 1.5 cm plain icing nozzle
- Approximately 1.5kg fresh berries and flowers as liked
-
Place an ovenproof dish (I use an enamel one) filled with about an inch of cold water on the floor of the oven.
-
Preheat oven to 160°C and set the shelf so the cake tins will be no higher than halfway up the oven.
-
Grease and line two 20cm loose bottomed sandwich tins. Baking parchment lined with foil is fantastic as it is nice and thick so helps with even browning. I spray the inside of the lining (have the parchment against the cake batter) with oil - you don't want any stickage for a naked cake look!
-
Cream butter and sugar together until very light and fluffy, which will take several minutes for butter. CAUTION - for the dairy free version, this will take a mere 60 seconds and you should use the spread straight from the fridge. Beat it too long and it will split and curdle.
-
Sift the flour and raising agents together twice.
-
Beat in one egg, plus a spoonful of the flour, then repeat for the remaining eggs.
-
Sift over the remaining flour, scrape in the yogurt and vanilla then mix until no streaks remain. Do not over mix.
-
Divide the mixture between the two tins, spreading the mixture up the sides of the tin so there is a hollow in the middle. This helps them to bake nice and flat. Bake for 35 minutes.
-
Cool in the tins for 10-15 minutes then unmould and finish cooling on a rack. I lightly cover them with a clean tea towel. If not filling until the next day, wrap the stone cold cakes in clingfilm and store someplace cool.
-
When ready to sandwich, beat the butter until lightened then sift over the icing sugar and beat until light and fluffy. Again if making a dairy free version, this takes a fraction of the time and do stand and watch to ensure you catch it before it splits. Add in the vanilla and a little milk if not soft enough.
-
Use a little buttercream to secure one of the cakes to the cake board then spread the cake with the jam of your liking. Place the rest in the piping bag with the nozzle fitted and starting at the outside edge working inwards, pipe in concentric circles, leaving just half an inch of cake around the edge to allow for settling when stacked.
-
Top with the second cake and press down to secure - you can use a very clean spirit level to check it is level if you like. The beauty of this recipe is I've never had to trim a cake as it rises perfectly flat.
-
Dust heavily with icing sugar and top with the fresh fruit.
-
(If stacking with other cakes, push the dowels through the cake at the 12, 3, 6 and 9 o'clock positions about an inch in from the outline of the cake to be stacked upon it. Trim level with the cake using pliers. Use a little extra buttercream over the exposed dowels to secure the next tier with.)
* = if you are making a DAIRY FREE version, they use a dairy free spread like Pure in place of the butter; and Alpro Soya Yogurt instead of the Greek yogurt.
I use vanilla extract in the cake, but vanilla powder in the dairy free buttercream as it will split otherwise.
** = for dairy free buttercream, I use 50g solid Stork and 50g Trex instead of the butter.
If making the entire wedding cake, you will need 500g butter (or 250g solid Stork plus 250g Trex) plus 1kg icing sugar plus 1 tbsp vanilla extract (2-3 tsp vanilla powder for dairy free buttercream) plus approximately 50ml milk/almond milk to loosen the texture enough.
This post contains affiliate links, meaning I will earn a little commission if you chose to buy items I’ve advertised, helping me to bring you all these recipes for free!
Like this post? Then why not try these related recipes:
-
- Strawberry Lime & Vanilla Jam
-

- Vanilla Yogurt Cake
-

- Bing Cherry Jam
Wow so many amazing tips! I’m terrible at decorating cakes, I might just be able to manage a naked one but I think I’m better off leaving it to an expert like you 😀
Aw I’m no expert Becca, just a keen home baker! I’m hoping me doing it can show what you can achieve with a little bit of practice 😀
This cake is BEAUTIFUL……honestly it’s gorgeous, a lengthy read but worth it nevertheless. Thank you so much for providing some substitutes I am dairy free so I appreciate when fellow foodies mention a few alternatives to make the recipe more doable, you rock!
You’re very welcome Darla, and thanks for sticking with this very much long haul post lol!
That cake is GORGEOUS! I’ve never been much of a baker (because I’m so bad at measuring things! I always want to eyeball it, haha) but this looks absolutely amazing!
Thanks very much Liz :D. You do kinda need to be accurate in measuring for a wedding cake but once you’ve done a bit of baking, you can get a bit slapdash and just chuck bits in 😉
That is one fine looking cake. I really like the naked cake style. And may I just say that this post is one of the most practical, information-filled spots on the Internet? You have insured success for your readers. Well done.
Thank you so very much Dorothy, that means a lot coming from a fellow blogger.
Um… Yum! This looks incredible!! We also had a tier of cupcakes at our wedding. To do it over? Something decadent, chocolate and fancy is how I would roll.
I must admit I was thinking of a tower of naked cakes but each layer being different – like vanilla, chocolate and carrot cake mmm!
Wow, wow, wow. I am mega impressed. My sister has asked em to make her wedding cake (EEK)! But haven’t yet convinced her to go down the naked route (she wants buttercream). This looks amazing though. You should be so proud!
Oh thank you Emma! Buttercream is a great option, that would be my second choice. Best of luck making the cake! Xxx
Wow!
Thanks for this post, very useful. I’m planning to bake my own wedding cake, so I’ll be doing a lot of practicing over the next few months! Think I better get myself an oven thermometer…
P.S. I love Beanies too!
Oh do you live around here too Rosie? I didn’t realise that. Enjoy practising for your own wedding cake, that’s half the fun trying out new recipes and techniques ahead of the big day 😀
Thank you, I’ve been asked to make a naked wedding cake so this is really useful! Can I just check how much yogurt you need for the 6, 9 and 12 inch cakes? I may have missed it but as it see it in the ingredients. And I’ll definitely be getting an oven thermometer!
Hi Helen – I’ve updated the graphic with the yogurt amounts in. It slipped past my notice so thanks for letting me know! Good luck with the cake and let me know if you need anything else x
That’s great, thank you! Just to check, did you make 3x the amount in the grid for the 9 and 12 inch layers (in separate tins)? A bit nervous about making this wedding cake but your recipe sounds lovely! I think I’ll have a practise run this week ?
Sent from Yahoo Mail on Android
Yes Helen but I made the 9 and 12 inches one cake at a time as you can’t fit more into a domestic oven and have a reliable, even bake. A practice run is a great idea!
Hi, Baking this for a friends wedding as she felt madiera too dry….Mine seemed to rise lovely but have shrunk a little to about 1″….also my sides arent as straight as yours they seem to ahve slumped!….Any advice on this?? I am thinking it may add to the rustic look but just wondered what I was doing wrong!. Also can this be frozen after baking, cooled and then defrosted the day before I need it is away? Thankyou Charlotte
Hi Charlotte – thanks for trying the recipe and stopping by. Sorry to hear it didn’t go to plan. Usually sinking cakes are due to adding too much raising agent – perhaps you over measured accidentally? Also, cakes can sink if they aren’t fully cooked so press the centre to see if it springs back, test the centre with a skewer to look for raw batter and listen to it (without burning your face like I did!) to ensure it isn’t “singing” still (bubbling and cracking sounds). I’ve made countless cakes to this recipe so I’m sure you can get it to work for you! It will certainly my deliver the moistness you need as a basic Madeira can be very dry xx
And one last thing Charlotte – it turns out there is such a thing as creaming butter and sugar for *too* long. As a test I tried a few where I beat these for a minimum of ten minutes in my KitchenAid and whilst the cakes were implausibly light and fluffy, they did wrinkle and shrink back from the tin. There’s a point where you’ve incorporated so much air in the creaming stage that you lose all structural integrity and the cake can’t support itself even when fully baked. I hope this all helps! Xx
Fab; I’m guessing thats it and I’ve over creamed as my butter was already soft…I will try and cream the next layers a little less. I will also
bake an extra layer and run with it as all definitely cooked 😉 I do the singing test too – so I am confident they are cooked. Shes having 5 layers so its going to be a tall cake anyway. I think I will perhaps trim the outsides straight 😉 I guess it will all add to the rustic affect.It tastes lovely
one last Q- Is it ok to freeze the layers to split and buttercream at a later date?
Yes it freezes brilliantly but try not to leave it longer than a month as all cake dries out in the freezer. I wrap tightly in two layers of cling. You can split and fill then freeze or split and freeze singly. It does taste good doesn’t it?! 😀
do I use unsalted butter or salted?
Thanks
I use unsalted Marlene 🙂
Just tried this recipe as my daughter wants me to make her wedding cake and we all agree its the one. Is it possible to add flavourings and have say a vanilla base layer, next chocolate and then lemon? Any advice would be welcome. Thank you x
Hi Jackie – thanks for stopping by to comment. I’m so delighted this will be your daughter’s wedding cake! How wonderful 😀
You absolutely can add flavourings to the base recipe to change it up for the different tiers. It would be simple as adding some lemon/lime/orange zest and a little of their extracts to get a good flavour coming through – better than adding juice which will knock the ratios out. I love Star Kay White extracts or those from Bakery Bits for true to life, potent flavourings.
As for chocolate though, I haven’t ever actually adapted my vanilla yogurt cake to a chocolate recipe (although that is immensely appealing now you mention it!). The chocolate cake recipe I use of choice for celebration cakes is Ina Garten’s one (here is a UK measures version of the recipe: http://www.foodnetwork.co.uk/recipes/beattys-chocolate-cake.html). It is super moist and fudgey so would be more than ok making even 3 days before the wedding (possibly more). My tweaks are to reduce the sugar to 300g and if you are worried about the coffee, you needn’t be as it really does enhance the chocolate flavour. Although, you could use 1 tsp instant espresso powder in 250ml water so making it weaker, rather than cutting it out altogether.
I’d love to see some photos of the cake when it’s done, if you have time to share one with me. My email and social media accounts are all on the blog so there’s a few ways to share it (if you don’t mind!). Let me know if you have any more questions and I’ll do my best to help x
Thanks for the help Jo – that chocolate cake looks and sounds amazing! The weddings not until January 2018 (i’m just getting some practice in) but I will definitely let you know how I get on and send you some pictures (fingers crossed)!
That’s great Jackie – so pleased I could help. And I was practising my wedding cakes about 5 minutes after Hungry Hubby proposed so I understand your getting started early 😉
Hello, what a fabulous sounding Recipe, and just what I need for my niece’s name birthday cake. Please could you tell me if your oven temperatures are fan or conventional ?
Hi Roberta! Thank you for commenting and for picking out a recipe to try.
All of my recipes are done with the fan turned off in my oven – so they are conventional temperatures (the exception being my macarons which are done with the fan on – but that’s made obvious in the recipe)> I really hope you enjoy the cake – do let me know how you get on xx
Hello, wonder if you could help? My first cake, which I made in sandwich tins was delicious, soft and fluffy. Today I’ve made 2 6″ cakes using Total full fat Greek youghurt . Both have risen beautifully look soft and golden, but when I cut into them they’re very stodgy and a bit greasy. Should I have used different yoghurt. I can’t remember which one I used with my first successful cake, which was absolutely glorious. Hope you can help . Thank you
Hi Roberta, thanks for stopping with your question – I hope I can help. You could well be very right about the Total 0% Greek yogurt. I have used it once or twice but I usually beat it with a little milk to loosen up the texture. I now make all my own yogurt and even when strained, it’s not as solid at Total’s. Other brands I buy are Tesco or Sainsbury’s full fat or lower fat (*not* the lowest fat – that is too runny) Greek yogurt in the big 500g pots. It’s got a much higher liquid proportion so will give a lighter cake. Also, it can be tricky to get a 6 inch to cook through without it getting overly brown when you bake all the batter in the one tin. I find the 6 inch one can be a little denser than baking in individual layers as I do for all other sizes so if you have a second 6 inch tin, making it in two layers would certainly help with the texture. Even if you put two thirds of the batter in one tin and 1/3 in the second, it should improve the bake. I’m delighted to hear how your sandwich tin cakes came out – that’s exactly what they should be 😀 x
Thank you for your very quick response and tips….. will let know how I get on with them. Many thanks again
You’re very welcome Roberta. I do my best to answer comments with questions asap. I’m always about on Facebook if you have any urgent queries x
Hello
I am making my friends wedding cake and have just come across your recipe. I am making a 6, 8 and 10 inch cake to then stack. Would it be possible to send the measurements and bake times for the 10 inch please? I am making two of each and then slicing in half to half four layers per tier – would this work with the measurements you suggest?
Thanks
Emma
Hi Emma – I’m really glad you found my recipe and are considering using it for your friend’s wedding. As you want 2 cakes to be split into 4 layers, what I would do is make the 12 inch quantities twice. So one batch of this quantity baked in a 10 inch tin and when cold, split. Then repeat. You are still looking at approximately one hour to cook each cake as it will be quite deep (so depending on your oven, be prepared to give it longer to cook through). This will give you a very good depth of cake which will allow for splitting and levelling without reducing the layers to a very thin and mean depth. Hope that helps – let me know if you have any more questions. Jo x
Just wanted to check with you about baking temperature. Is the 160 degrees Celsius you state in your recipe for a fan oven or do I need to reduce the temperature for fan? Many thanks!
Hi Abi – thanks for your question. All my recipes are for conventional ovens unless stated. If using a fan oven, I would still cook at 160°C but be prepared to cook for less time.
Hi Jo
My son and girlfriend have asked me to make a Vegan Naked Wedding Cake for their wedding next year. I am thinking of making the layers different flavours. I have made a note of how you have substituted the butters for dairy free. What about the egg? Have you tried using an egg replacer or do you just leave out the egg for vegan? Any tips for slicing the large cakes to split them ready for adding the filling please?
Thanks
Carol
Hi Carol – thanks so much for your question. I haven;t actually gone so far as to remove or replace the eggs from this recipe, and I wouldn’t feel comfortable telling you to for such an important cake without having tried it myself! I’m afraid I don’t have a go to vegan vanilla cake just now but my friend who is vegan has used aquafaba to replace some eggs in various cake recipes with success. As for splitting the cakes – the way I do it is to bake each layer separately so you don’t have to slice the cakes at all.
If I ever make a cake tall enough to require slicing though, I just use my JML serrated knife to slice straight through. You can use tooth picks inserted around the cake if you need a guide to help you cut straight. I tend to wing it myself! Another baker friend uses the Agbay cake slicer and swears by it if you want to buy a tool to use. Sorry I couldn’t help more with the egg side of things x
Hi, I’ve made several of your delicious vanilla yoghurt cakes now with great success . Now I’m going to attempt a semi naked wedding cake. Do you think this is a suitable recipe for such a cake and if so, do you have any tips I.e. The type of buttercreAm to use for the semi naked bit. I was wondering if adding white chocolate or ganache would help it to be more solid and easier to transport (to Dorset from London!) be grateful for any advice you may have. Thank you
Hi, Roberta – thank you for your question (and I’m super happy to hear you’ve made the vanilla yogurt cake so much!). It’s perfect for a semi-naked, smeared on buttercream sort of cake. If you can though, I would wrap the individual tiers of cake in cling film and take the buttercream with you. Having had an assembled cake slide very significantly (even with dowels) on a 10-mile drive, I wouldn’t advise anyone to do the same! Not unless you have someone to baby sit the boxes all the way to Dorset!
You can use standard buttercream or add in some chocolate if you like. If you want a firmer buttercream, professional cake makers often use a little royal icing sugar in theirs to make it thicker and more rigid without compromising the taste. Just sub a third to a half of the ordinary icing sugar with royal icing sugar and continue as normal. I hope that helps – let me know if I can be of more assistance x
Hi, I’m going to attempt to do this cake recipe for my naked wedding cake. Could you use a self raising cake and pastry flour? And if so, would you add anymore baking powder or salt?
I’m really excited to ty this recipe!
Thanks
Hi Krista! Actually, I used to make this with 50:50 plain to self-raising flour but I settled on the proportions above. Essentially I did the maths and worked out how much raising agent I needed based on the typical proportions you find in S/R flour. I wouldn’t add any more raising agents or salt as you’ll over do it but a straight swap should still work. I would always encourage a trial run for such an important cake so you get to know how it cooks in your oven using your typical ingredients x
Hi Jo, I am making this cake as part of a naked wedding cake for a friend and am on my second tester cake currently. The first tester had a chocolate 1st layer with this on the top. When I took off the top layer though the top of the first layer stuck to the cake board on the top layer and some of the cake came off the bottom layer. Not a look I would want for the final wedding cake. Any tips on how to avoid this please?
Hi Wendy, I’m really pleased to hear the trial cakes are going well so far! What I would do is trim the dowels a little longer – like 2-3mm taller than the cake. This should mean that the top cake only touches it lightly but it’s not so tall that you should see a gap in the final assembled cake. I would use at least 5 dowels for extra stability and use a tiny blob of royal icing on each of the dowels to secure the top cake x
Hiya! Can I please clarify that the table shows ingredients for each layer required, rather than each tier?
Also for a cake for 100 what size tiers would you recommend?
Sorry if answered elsewhere… I’ve enjoyed reading this great page and seemed to have missed it if it is!
Thanks in advance!
Cindy
Hi Cindy, thank you for your lovely comment and question. Yes, you are right about the ingredients being for each cake layer, as opposed to the whole tier. That way, you can make each tier double, triple or if you needed a massive cake, even four layers of cake high lol!
For a wedding cake to feed 100, the 6-9-12 inch combo will be just about right, bearing in mind that wedding cake slices are usually much smaller than if you were just feeding the family for Sunday night tea! 😉
Just wondered if you can advise. I’m taking a risk and baking my daughters wedding cake to this recipe. Only thing different is that I couldn’t get a high sided 6 inch tin so have a 6cm high one. Therefore I’ll have to make 3 separate 6 inch cakes. Should I just divide the 6 inch ingredients by 3 and at whet temperature and for how long should I bake?
Thanks for what looks like a great recipe
Allan (brave dad!)
Hello Allan! Well firstly, congratulations to your daughter and to you for being brave enough to tackle the cake! The safest way to proceed would be baking it in three goes for sure – and by “safe” I mean, the best way to ensure a good bake all the way through the layers. You would be best to bake them for 20-25 minutes at the same cooking temp as stated in the recipe and keep an eye on them. I would strongly advise having a go at making this layer now so you get a feel for the recipe and do make some notes on temp and cooking time ready for the big day. It will help ease your stress quite significantly x
Hi , I am making this lovely cake for a wedding cake for my cousins wedding this weekend and I have 2 questions for you if you could possibly answer them that would be great the first is the Greek yoghurt which fat content Greek yoghurt do I purchase 0% fat 5% fat ‘ there are to many to choose from , and also my bake on my last trial of a 6 inch the cake was very dense in places and it almost look like it was raw is this how it is supposed took or did I not mix the yoghurt in properly , whoops one more question is it ok to use baking belts ,
Thank you julie
Hi I’m wanting to make a 12” 10” and 8 version of your wedding cake and I would like the layers to be roughly the same height do you have weights for an 10 + 8 “ that would make the same height as the 12” you have on your blog .
Regards Theresa
Hi. I’d be interested in the fat content re yogurt. I find too much choice and don’t know which to go for. I know to avoid low fat but after that ???? Also there are Greek style yogurts are these the same but they aren’t authentic Greek – ie made in Greece?
Hi,
This recipe looks great! I’m hoping to make an 8 inch and a 10 inch cake (both 4 inches tall). Could you advise on quantities please?
Thanks!
Sam
I am making an 8 and 10 inch cake for my wedding. I wanted to do three tiers each. How would you suggest altering the recipe? I could double the batch for the 8 and weigh out the pours but I am at a loss for the 10″ cake.
Hi, I’ve just tried this recipe but after baking for 35 mins the cake was nowhere near done. I left it another 10 minutes until the skewer was clean but I’m still not sure if it needed longer. The cake tastes very nice but it looks and feels ‘damp’ if you know what I mean and is very moist.
Is this right?
I appreciate your help!
Hi.I am so happy I have found your site. I have been trawling the internet in search of a Victoria sponge like cake, that can be used for a Wedding Tiered Cake and everywhere I look people say you can’t use Victoria sponge, but hopefully I’ve found what I need right here. I have read through your blog and the tips you give are going to be really helpful. I’ll be making my daughter’s Wedding Cake in October and am trying to be as prepared as possible. One thing I wondered is how deep is each layer within the tiers, shown in the cake in the pictures? I want my tiers and filling to come up to about 4″- 4.5″ in height. Short of making the quantites and just using less, what calculations would I use to reduce each layer slightly so that the end result is less deep than those in the picture. Is there a height prior to baking the cake mix when you p. Hope that makes sense. Thanks for your hard work, so that the rest of us can benefit.