

This post has been 18 months in the making. In July 2013, I bought 500g of plump, pliable, floral vanilla pods and started the very simple but tantaslisingly slow process of making my own vanilla extract. Just look at the colour of this magical elixir…

The foundation of so many recipes as well as the star of a great many, a good vanilla extract is a baker’s secret weapon to win friends and influence people. It tastes of our childhoods – cakes, ice creams, milkshakes alike, the nursery sweetness transports you back to happy, comforting sweet times.
Many of us remain vanilla lovers forever, rejecting more experimental flavour combinations altogether – don’t we all know someone who only likes “plain” cake? Perhaps I’m a bit odd but I do recall the first time I used Nielsen Massey vanilla extract in it’s short stubby brown glass bottle with buttercup yellow label after only ever using a drop or two of synthetic vanilla essence many years ago now.
It changed my baking and I’ve never looked back since, nor changed brand even – it is that good, and I have been baking a long time now. At the time I started the steeping process of those precious vanilla pods, (which actually are the fruit of climbing orchids grown typically in exotic locations around the world including Madagascar, Mexico and Tahiti) I had purchased one heck of a bargain – a litre of Nielsen Massey vanilla extract from this company, who reasonably often run offers on it.
I vowed I would be patient and wait until every drop had been used before I plundered my 2 litre Le Parfait Kilner jar of its juicy beans. Of course, I did use a few along the way for homemade custards and other special bakes were the tiny seeds are needed to impart their flavour as well as give that fine speckled appearance. How could you turn down a perfectly wibbly wobbly vanilla wanna cotta stippled with those teeny black dots? I know I couldn’t.

A delightful perk of making your own vanilla extract at home is after the pods have stood long enough to absorb the vodka you use to extract the natural vanilla flavouring with seeps inside the pod and if you cut the end off, you will be the proud owner of your own vanilla paste! A commercial product which is sinfully expensive to buy (extract is pricey enough but the paste is even higher in cost per teaspoon and often you would be just as well to scrap the seeds from a fresh bean).
It’s fantastic squeezed into meringues or Swiss meringue buttercream. You do need to ensure you get plump, juicy pods are skinny dried up ones aren’t particularly absorbent and won’t give you the best flavour. Not all pods are created equal but I’ve always found Vanilla Mart to be the best supplier, having had some duds from supermarkets and eBay.

The important things to know if you intend on making your own vanilla extract are as follows – after sourcing the best pods you can, find a jar which just accommodates them as otherwise, you will end up needing a rather offensively large volume of vodka to steep them in. Any jar which can be sterilised before you start with a well fitting lid will do. My half kilo of these long Madagascan pods fitted snuggly in my Kilner jar but I did need to use about 1.5 litres of vodka to cover them completely.
Of course, this method means you could soak as few or as many pods as your budget and patience allow. Use a vodka which you would be happy to drink – if it tastes harsh and raspy, it will produce a vanilla extract which smells and tastes of bargain basement booze, I’m afraid. It’s said you don’t lose the harsh edge when you do it yourself but honestly, in a taste test and blind smell-off, I couldn’t tell you my vanilla was any less wonderful than good old Nielsen Massey. I think keeping it for so long was key – I would say 6 months is the absolute minimum you need to steep the pods for – a year is good, 18 months is fantastic.
As luck would have it, I had a bottle of the good stuff we’d bought on honeymoon which wasn’t getting drunk anytime soon so that was sacrificed to my pods. After standing for a few weeks, I needed to buy a small bottle of extra plonk to top my jar up with as the beans absorb the liquid and you want to keep them submerged to preserve them as best you can.

From time to time, give your jar a gentle shake to agitate the liquid around the pods (beware Kilner jars aren’t perfectly hermetically sealed so you might end up staying yourself with vanilla vodka if you get too enthusiastic!). If you want seeds in your extract, you can slit open a couple of beans and add them to the vodka before you seal them up.
The longer you can leave it, the more intense the vanilla flavour, the less potent the alcohol scent, plus the deeper the colour will be. You could always use up your beans by scrapping out the seeds to use in your bakes then hanging them up to dry for several days before stowing them away in a jar of caster sugar. I always, always add my spent pods into my sugar jar and it gives another layer of vanilla to all my cakes.
This way, the extract also has longer to form yet you get the benefits of the seeds along the way. Better for the impatient vanilla junkies amongst us. Decanting into small bottles and adding a pretty label make homemade vanilla a beautiful gift for the fellow bakers in your life. If the bottleneck is too skinny, you won’t be able to retrieve the pod when the extract is used up (well, perhaps you could with a crochet hook!) but with a wide enough one you can add one of your beans to add to the aesthetics of the gift. Keep it in a dark cupboard and it will last as long as you need. Or as long as it takes you to use it up in your wonderful home baking.
This post contains affiliate links, meaning I will earn a little commission if you chose to buy items I’ve advertised, helping me to bring you all these recipes for free!
Like this post? Then why not try these related recipes:
-

- Ambrosia Jam
-

- Microwave Lemon Curd
-
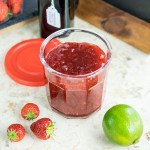
- Strawberry Lime & Vanilla Jam
Thanks Sharon – home made is so the best 🙂
mine is just coming up to 8 months of “brewing” sadly I wont get the paste as I cut the pods up to put into the vodka, back then no one had any instructions that I could find so it was experimental. I also have coffee extract making in the same way and started on the same day with coffee beans inside. that’s looking good also
Ooo coffee extract sounds interesting!
look at the colour! How much did the vanilla cost you originally. I’m tempted to try something similar myself!
The vanilla was £13 for 500g very long, fat Madagascan pods. I had a 10% off code as I’d bought from them before. Like coffee beans, the price of vanilla pods is rising steadily as supply falls so I’m not sure you could get them this cheap again. The colour is fantastic isnt it? 🙂
I love making homemade vanilla bean paste – so much cheaper than buying it!
And so satisfying to do yourself!
I have done this, but mine is no way as dark and rich as yours… It saves a lot of money also!
I think it may be cheaper to make it if you get a good deal on the vanilla and the vodka but I so love making my own versions of things like this I don’t mind if it works out a but more expensive.
Same here!
I hope you like it 🙂
Hi Jo and thanks for posting this ! How many pods would I need ? Also, can I use white rum (70C) or amber rum(40C) ?
Yes of course – I bet it would be delicious. I haven’t counted my pods, just weighed them – essentially buy as many as you can afford and cover with alcohol 🙂
I’m from the French West Indies so I guess they’d use rum anyways lol. Thanks for that. Well, I’ll see If I can try with a pack of 20 pods
for now see how it goes.
Cool beans. Hope it goes well – I’m sure it will 🙂
Btw, did you get the pods from vanillamart? Were they the premium Madagascan pods or the extract grade, which are dryer. I love vanillamart you know. They’re great ! I’m planning on doing a batch with those and Tahitian pods and another with madagascan and mexican pods.
I did – they are a great vanilla retailer. I can’t recall for sure as it was so long ago whether their were Madagascan or not but they were definitely one of the higher quality beans. Enjoy your single origin, hand made vanilla extracts 😉
Thank you. Well, almost there. Waiting on my extract beans , tahitian and mexican pods. The rest of the extract grade I’ll grind to make vanilla powder. The question of how many beans to use is always ever present lol. I’ve already split a few gourmet I had left for more flavor and will put as many extract grade pods as I can.
Exciting times!