

I was so excited to find a Battenburg cake tin going mega cheap in a local kitchenware shop as they were closing down. I mean, just look at that perfectly square, checkerboard slice of cake. Doesn’t it make you smile? For me, it conjures up idyllic images of children’s birthday parties and high teas.
The traditional cake is simply a Victoria sponge mix flavoured with almond before colouring half of it pale pink. Spread with apricot jam and wrapped in marzipan, it was originally created to commemorate Queen Victoria’s granddaughter marrying Prince Louis of Battenburg in 1884. It’s component parts are super simple to make but it is a little fiddly to assemble which is why I fear more people buy a packet of Mr Kipling mini Battenburgs before they make their own at home.
I’d like to try and change that. This post is jam-packed full of helpful tips and tricks about how to make a perfect Battenburg first time at home and seeing as it is about to be Christmas (yay!), we’re going to make a Peppermint Battenburg Cake.
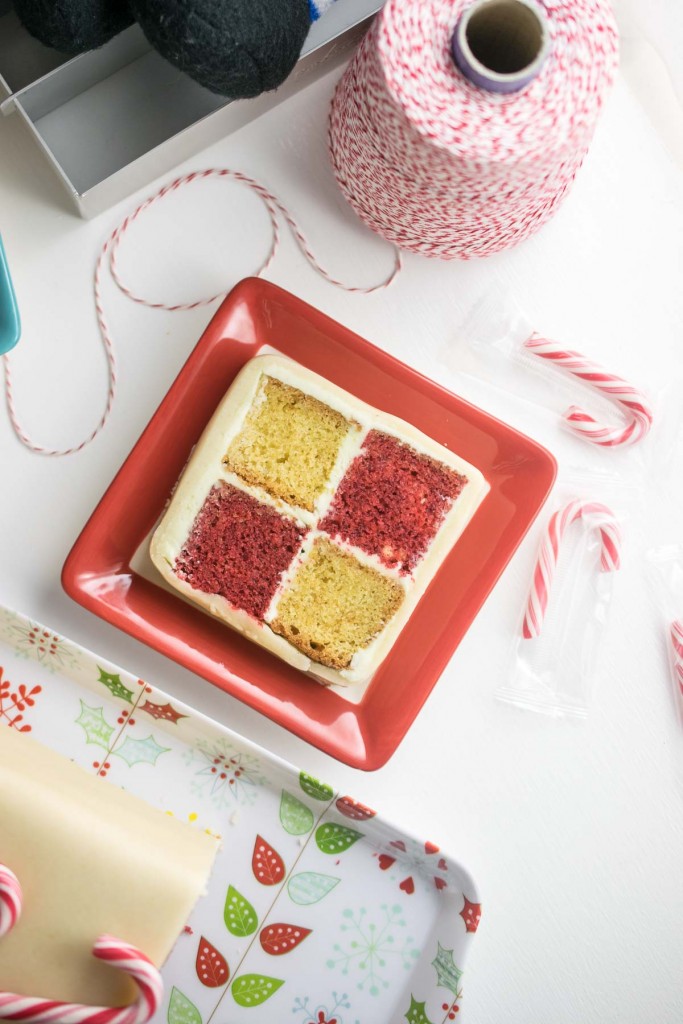
After buying the tin, my mind was racing with possible flavour combinations to freshen up this classic bake but the pot of mini candy canes on my kitchen table caught my eye and I had a eureka moment!
Now, without making an entirely different sort of cake mix, you won’t get it absolutely snowy white it is pale enough against a well coloured red sponge you get the candy striped, red and white effect good enough here.
I toyed with the idea of adding in some chocolate but thought peppermint alone would be better, especially if you are using white marzipan (such a thing does exist although it is not a true white) which of course, brings the lovely warm and super sweet almond flavour with it. If you cannot abide the stuff, and I know lots of friend who don’t, then simply use white sugarpaste which has the added benefit of being crisp and bright white in colour.
Now, I did splash out and buy myself a specialised which makes things a lot easier but I do appreciate it’s quite a specialised item and you may not want to splurge on it if you only plan on trying this the once – after all, there are so many cake recipes in the world and so very little time to bake!
In that case, please be rest assured that I’ve got you covered. Simply bump up the ingredients as per this infographic below and proceed as per the standard method, using an 8 inch square cake or brownie tin instead. I think most home bakers have a tin of these dimensions so hopefully the extra recipe will helpful here.
The only one thing you have to do differently is to line the tin in such a way that you divide it in two. You pleat up some foil (or preferably, the much more sturdy and malleable foil lined baking parchment that I always have in my kitchen drawer for such jobs).

The final word needs to go to the colouring of the batter. Now, I know a lot of people dislike using lots of food colouring and to be honest, neither do. Using food colouring gel is much better than a liquid as it is so pigmented you can reduce the amount down to half a teaspoon and still have a reasonable payoff. I use Sugarflair Christmas Red.
If you can’t bear the thought of using it, then know using freeze dried raspberry powder is a really good and natural compromise – I would use raspberry as my first choice as it gives a better shade or red but you could use strawberry or cherries ground down in a coffee grinder if you already have some.
Say from making my Strawberry Milkshake Cookies or Bakewell Biscuits! The red won’t be quite so Father Christmas red but it will serve the purpose. If using the powders, use a rounded tablespoon worth and mix with 1-2 tsp boiled water before adding to half the batter.
My Top Tip though if you are using food colouring gel is to dissolve it first in a tiny amount of boiled water before adding to the batter – it can be really lumpy if you don’t do this and you’ll risk toughening it up so much to turn it into bread from beating the daylights out of it to get it to blend, lol!
This is one recipe to read through completely before you start baking but I promise it’s easy and you can always comment with questions and I’ll get back to you as soon as humanly possible. Merry Christmas everyone!

- 1 tsp recently boiled water
- 1 tsp red food colouring gel*
- 150 g very soft butter
- 150 g caster sugar
- 150 g eggs*
- 150 g self-raising flour
- 1 tsp peppermint extract
- 400 g white marzipan or white sugarpaste
- 90 g very soft butter
- 180 g icing sugar
- 1 tsp peppermint extract
- 8 x6 inch battenburg tin see post for how to adapt to an 8 inch square tin
- Two disposable piping bags or heavy duty plastic food safe bags
-
Start by taking the dividers out of your battenburg tin and lining the base with baking parchment. Replace the dividers and spray liberally with oil/bake release/brush with melted butter. This really helps getting it out after baking so don't skip it.
-
Preheat the oven to 180C.
-
Start by dissolving the food colouring gel in the boiled water - I do this in a tiny bowl or teacup with a tiny spatula. This makes it so much easier to blend into the batter later. Set aside.
-
Cream the butter and sugar very well then beat in the eggs, with a little of the flour to prevent curdling, followed by the peppermint extract. Fold the rest of the flour in.
-
Divide the batter in two (I am pedantic enough to weigh it and split evenly - this is easier if you know the weight of your mixing bowl before you start!). Into one half, fold in the watered down red food colouring and stop as soon as there are no more streaks. Fill your two piping bags with the plain and red batters.
-
Cut off a wide opening (about 2cm) from each bag and pipe exactly half into two of the "lanes" in the battenburg tin. It's soooo much easier than trying to spoon it in, it is very well worth getting some piping bags for this purpose.
-
Bake for 25-30 minutes until very well risen and a skewer comes out clean when inserted into the centre of each cake. The cake should rise above the level of the tin but not spill over if using these exact amounts.
-
Leave to cool on a baking rack until room temp then use a very sharp serrated knife to trim any excess off level with the tin - it is much easier to get a neat finish doing it this way than freehand after unmoulding the cakes.
-
Mix the buttercream up by beating the butter until light and fluffy then beating in the icing sugar and peppermint extract. Knead the marzipan or sugarpaste until soft then roll out to 8 by 12 inches approximately.
-
Now here comes the fiddly bit - sandwiching the strips of cake together with buttercream. I do this on a piece of reusable silicone but baking parchment would do too. Spread a thin layer of buttercream along the length of a red sponge, then offer up a white one to match it. Spread their tops with more buttercream then place a white strip on top of the red, and red on top of the white, again spreading a little buttercream in between them. Cover the outsides of the cake but not the ends with a thin layer of buttercream and if it is very soft, pop in the fridge for just 20 minutes before covering in marzipan.
-
Lay the rectangle of marzipan in front of you, long side facing you. Flip the buttercreamed cake into the centre of this marzipan, with it's short, non-buttercreamed edge facing you. It should match up sizewise pretty much perfectly and you will have two exposed sides of marzipan to wrap the cake up in once you've buttercreamed the base. Pressing the seam together neatly and trim off any excess.
-
Sit the cake on a serving plate with the seam side down and trim off the edges to expose the red and white checkerboard pattern. If not eating immediately, I press pieces of clingfilm up against the cut surfaces to prevent them drying out. It will keep for at most 2 days stored like this, preferably in a cake tin or other storage box.
If using an 8 inch square tin, please refer to the blog post for the slightly scaled up ingredients list but continue as per the same method. The cake will most likely take an extra few minutes to bake.
*= yes, I crack my eggs and way them - you need approximately 3 medium eggs here. Any leftover, I pop in a small food bag and freeze to use later for egg-washing pastry. Top Tip alert!
**= I use Sugarflair in Christmas Red
This post contains affiliate links, meaning I will earn a little commission if you chose to buy items I’ve advertised, helping me to bring you all these recipes for free!
Like this post? Then why not try these related recipes:
-

- Mint Chocolate Mini Rolls
-

- Nutella Christmas Pudding Truffles
-

- IP Chocolate Orange Cheesecake
Beautiful looking cake! Perfect for any gathering during this festive season.
Thank you Agata!
Wow!!! Love your cake!!! It must have taken you a lot of effort to make it, but it deserves every minute you spend while preparing it. It looks so festive… and ideal as a sweet treat…
It’s a little time consuming but not too bad really! It’s quite fun to do all the assembling bits and pieces 😀
You are killing me with your desserts! They’re so creative and beautiful — and peppermint — HELLO!!!
Lol aw thank you Lisa! You’re too kind 😀
I’ve never seen a cake made this way. What a wonderful Christmas dessert centerpiece!
Have Battenburgs not made it over to America Dan? I wouldn’t be entirely surprised as they are quite old fashioned now but enjoying a resurgence since they appeared on the Great British Bake Off a few seasons ago 😀
Oh my goodness! This cake is so darn cute! I love this fab idea!
Thank you! I love the checkerboard appearance of a Battenburg – makes me think of court jesters in medieval times lol!
Oh wow! It looks great
The look of that cake is just fantastic! I can believe you’re glad you found the tin! It makes your nice recipe even look better :p
Cheers!