

Are you one of the readers of Every Nook & Cranny that have headed straight to my Homemade KFC, in search of how to make your own Bargain Bucket or Zinger Tower Burger? There are plenty of you that’s for sure!
Since I first published the recipe, it has been in the top 3 recipes consistently, which goes to show how many people love the drive of shame through the Colonel’s drive through 😉 The fantastic news is, with my combination of the not-so-secret spice blend and method of baking the chicken gives you the best of both worlds.
All of the flavour of that Southern fried chicken but a fraction of the fat (and none of the shame!). Whilst the bone in and burger homespun versions in my original post still hold true as tasty and satisfying meals, it came to me and Hungry Hubby in a blinding flash of inspiration that this KFC seasoning should not just be for fakeaways. Nope, I give you my KFC Kievs!

It was when I was refilling my homemade spice mixes (Pumpkin Pie Spice, Ranch Seasoning and Italian Seasoning to be exact) that it occurred to me that the KFC seasoning I make is just a spice mix.
There’s no reason not to use it in other dishes, it was just a case of finding the best vehicle for all those herbs and spices. Chatting it through with The Hungry One, who has eaten more than his fair share of garlicky, buttery chicken Kievs in his time, my KFC Kievs were born.
The trifecta of chicken, garlic and butter is a magical combination as it is but I promise you, just you wait until you’ve tried all that with this spiced (not spicy) coating. Oh my, I just had a moment there…
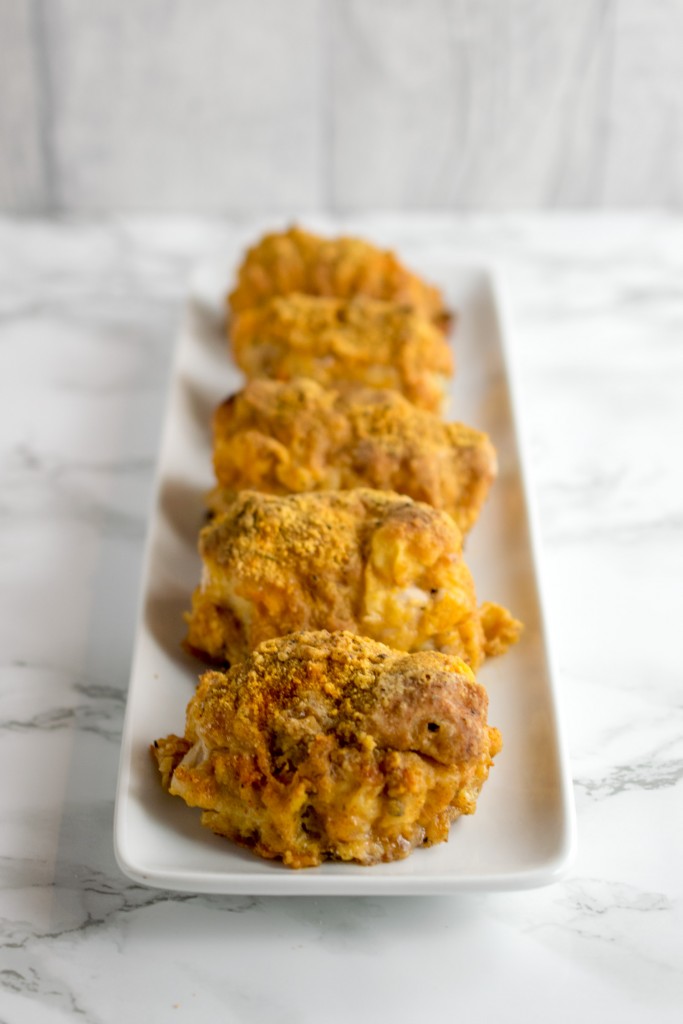
There are a few occasions where I use chicken breast preferentially (like in my chicken dinner for one or my creamy parmesan chicken pappardelle) but 9 times out of 10, it’s chicken thighs I cook with most often. They are just so much more flavourful, cheaper and so tender when cooked slowly. So skinless, boneless chicken thigh fillets is what I use here. They are a little fiddly to fill compared to breast meat Kievs but a few toothpicks and you’re laughing.
And for those few minutes work, you are rewarded with the most succulent Kievs you will have ever tasted. A little spritz of oil (or brushing with melted butter if feeling extra extravagant) before baking and the fat integral to the thigh will baste the meat and cause that finger lickin’ coating to crisp up beautifully on baking.
Any butter that escapes gets spooned over the steamed vegetables or potatoes I serve with my KFC Kievs but I find very little escapes even my cack-handed filling and I am forced to serve my steamed sweetcorn and new potatoes with an extra knob of butter. Forced I tell you… 😉

- 4-5 large skinless boneless chicken thigh fillets
- 3 cloves of garlic minced
- 1 tbsp of fresh parsley finely chopped
- 50 g soft butter if unsalted, add a fat pinch of sea salt
- 1 heaped tbsp KFC seasoning recipe on the blog in the link above
- 100 g plain flour
- 1 medium-large egg
- Oil spray
- Toothpicks for assembly
-
Preheat the oven to 180˚C and spray an baking sheet with oil - make sure you select a baking sheet with a lip to collect any butter which oozes out.
-
Mix and mash the garlic, parsley, butter and salt if using with a fork until well combined then divide into however many chicken thighs you have.
-
Lay the chicken thighs out in front of you with the insides facing up (so to speak - the part nearest the bone I mean). Add a portion of garlic butter to the centre then roll up the thigh and secure each with 3-4 toothpicks. I like to use two on the seam underneath and one each for the ends. You're just trying to contain the butter as best you can. Repeat with the remaining thighs and butter.
-
Mix the KFC seasoning (which has salt in it already) and flour together in a wide shallow bowl or dish and toss the tooth-picked thighs in it to cover well. You can use a spoon to help sprinkle it over the bits you mix.
-
Beat the egg in a second wide shallow dish and then dunk the floured thighs in it before returning to the flour dish for a second and final coating with the seasoned flour. I do the best I can in the dish, transfer to the baking sheet and when all of the thighs are done, sprinkle a little extra seasoned flour over each thigh with a teaspoon.
-
Spray each thigh with oil and transfer to the oven for 40 minutes until golden, crisp and so succulent and tender, you will never eat a chicken breast kiev ever again! There will be butter leakage from the kievs so after transferring to plates to serve, either spoon the excess butter over them or the potatoes/vegetables you are serving with them.
Serving suggestion - I like steamed baby potatoes and steamed broccoli, asparagus, sweetcorn, carrots etc. Maybe with a little extra butter if you have been good at sealing the kievs and they haven't oozed much in the oven 😉
Adapted from You'll need some of my KFC seasoning for this - link below!
This post contains affiliate links, meaning I will earn a little commission if you chose to buy items I’ve advertised, helping me to bring you all these recipes for free!
Like this post? Then why not try these related recipes:
-

- Homemade KFC Zinger Burger
-

- Ranch Chicken Nuggets
-

- Homemade KFC Bargain Bucket
Another for my to do list – thank you.
Just to add, I sometimes toss my roasties in this spice mix, also scrummy rubbed into pork skin before roasting.
That’s a great idea Kath – I love the idea of adding it to roasties – I’ll do that next myself!
Love the idea of this… and would be so easy to adapt for the Peachicks who I know would make these dissappear in no time!! x
They do have a habit of disappearing rather rapidly in the Apple Chapel too Midge hehehe 😉
It looks absolutely delicious. And it’s super healthy, no frying, no excess grease. Love it! Definitely will try this recipe. Thanks for sharing! 😉 Pinning and sharing!
Thanks so much for the pinning and sharing Natalie. Honestly, you won’t miss the frying at all, this are lusciously tender 🙂
These look fantastic. I’m a bit like you, I tend to get tunnel vision when I create something that was at first for a particular purpose. As you have proven there is no reason whatsoever that you can’t use your KFC spice mix with other things, yum!
Yeah and my friend Kath uses it on roast potatoes and I think that sounds a genius use for this spice mix! Might try it on chickpeas too…
Just stumbled across your site, and I’m so glad I did! Beautiful photos and great recipe ideas. Totally made my evening!
Oh thank you so much Bri, I’m delighted to hear you’ve enjoyed what you’ve seen so far 😀
I love chicken kiev and it reminds me of being a kid. The more garlic the better I say!
Oh yes, Hungry Hubby consumed many a chicken Kiev or mini Kiev as a kiddie, it’s definitely child friendly. Even with this foxy spice mix!
I love making my own spice blends. This sounds like a good one! The chicken kiev looks delicous! I agree about chicken thighs.
It’s great isn’t it Melissa? I love customising my own spice blends especially for harder to find ones. Still hunting down an Old Bay seasoning recipe 🙂
Oh yes these look like the bees knees.