

I first fell in love with bagels years ago back when I was in dental school and discovered a great little bagel shop behind Guy’s Hospital in London. They aren’t there anymore but I think I worked my way through their menu trying all the fillings when my student budget allowed for lunch!
Now, I’m sure you’re thinking that making your own bagels is only a step before madness but hear me out.
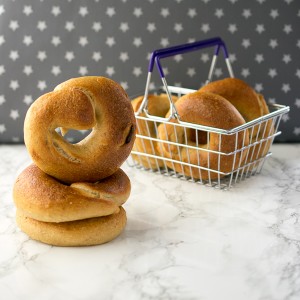
Of all the yeasted breads I make, I honestly believe bagels are very much amongst the easiest. Plus, like homemade roti, homemade bagels are so much superior to anything you can buy in a sad little plastic bag from the supermarket in both taste and texture. They freeze really well too if you don’t think you’re going to get through all 6 in a couple of days but I suspect that won’t be a bother to many of you!

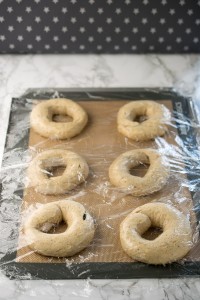

Bagel dough is a low hydration one, which helps them to keep their shape but also, it makes them easy to handle. Working with really wet doughs feels like trying to pick up a sleeping cat at times! After kneading and proving the dough to double its size, you shape the bagels into their characteristic ring form before chilling overnight.
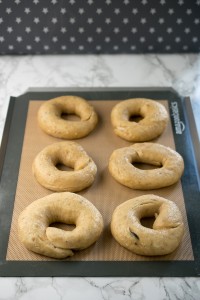
In the morning, you poach the risen bagels quickly to (and do excuse this unappetising description) gelatinise the starches which makes for a lovely rich browning on baking. See that glossy, almost sticky look in the close up shot above?
That’s the appearance you will get after poaching which also helps them rise nicely after a long cold prove. There’s loads of ways to shape them but I go traditional with my bagels, rolling out a long sausage shape then forming the hole around my hand:
Classic recipes use malt syrup or extract in the poaching water to give the glossy finish and also, a little malty sweetness. As it’s not something I use an awful lot (although homemade malt loaf if a delicious thing to use it up with) I mostly add honey to the poaching water and replace a small amount of the flour in the bagel dough with granary flour. That’s strong white bread flour which has malted flakes in it for extra smokey sweetness and it works really well to give flavour to the bagel.
As it’s a slow prove method, you get a well-developed flavour to the final bake which is just as a bagel should be – dense, chewy, toothsome. Once split open and lightly toasted, if not buttered then you must try them with a thick spreading or schmear of cream cheese. One of those simple pleasures that you simply can’t buy 😀
I promise you, you'll never have a better bagel than one you have made yourself and whilst it requires an overnight prove in the fridge, it is a very simple process.
- 50 g granary flour
- 350 g strong white bread flour
- 1.5 tsp fast action dried yeast
- 1 tsp sea salt
- 1 tbsp caster sugar
- 225 g water, at room temp (yes I weigh it, not measure it)
- 2 tbsp honey or malt extract syrup to boil the bagels
- oil spray for greasing
-
Mix together the dried ingredients, making sure not to measure the salt onto the yeast directly. Weigh out your warm-ish water and pour it in slowly, mixing with a spatula as you go.
-
Knead in a stand mixer for 5 minutes or by hand for 10 until you have a thick, stiff but smooth dough. Bagel dough is the stiffest dough I make - try to resist the urge to add more water unless it simply wont come together without a touch more.
-
Lightly grease the bowl and dough with some flavourless oil. Cover and allow to prove for 1-2 hours at room temperature until it has doubled in size.
-
Now to shape the bagels, divide your dough into 6 equally sized portions. Take one piece and roll it into a long sausage about 23 of an inch thick. Wrap the ends over each other and then seal it by slipping the circle of dough over your hand, and rolling back and forth on the worktop a few times to make it smooth. It should have a hole about 2-3 inches across in the middle - remember that it will grow more during the second prove, boiling and baking so the hole should be reasonably large at this stage.
-
Place the shaped bagels onto a greased baking tray or one lined with reusable silicone and spray lightly with oil before covering with cling. Make sure the edges are sealed but leave a little room for growth of the bagels. Place in the fridge overnight.
-
When ready to bake, preheat the oven to 200˚C. Bring a large pot of water to the boil, only adding the honey/malt syrup when it is boiling. Stir well then retrieve the bagels from the fridge and boil 2 at a time. Lower them into to boiling water and cook for no more than 30-45 seconds per side.
-
Using a slotted spoon, fish out the boiled bagels and allow to drain on a baking rack whilst you finish the rest. They will be sturdier than you think at this point and should have grown in size by 30-50% approximately.
-
Transfer the bagels to a baking tray and bake for 18-20 minutes until risen, beautifully burnished brown and sounding hollow when tapped. Cool on a baking rack before eating.
This post contains affiliate links, meaning I will earn a little commission if you chose to buy items I’ve advertised, helping me to bring you all these recipes for free!
Like this post? Then why not try these related recipes:
-

- Chilli Cheese Garlic Dough Balls
-

- Breakfast MC Bagels
-

- Slow Proved Focaccia
Tell me 12 more times it is easy. Okay, 13½ because I need the encouragement. I hate to make anything that requires proofing, punching and, heaven forbid,…a rolling pin. Yet, I adore bagels and I want some just like yours! We lived in Alaska where a local bagel show had a bagel spread called H.A.R.V. It was honey, almonds, raisins and vanilla mixed in with whipped cream cheese. I could have eaten with with a shovel. I’ve got to try my hand at these…sigh!
Yep, it really is that easy Tracy! If you have a stand mixer then you don’t need to knead and the most faff is a bit of shaping. In my opinion, it’s so worth it! That HARV filling sounds amazeballs alright 😀