
Mwuahahaha… BOO! Did I scare ya? Nah, thought not – I’ve too much of a love of pink and all things cute and cuddly to be truly scary. That doesn’t stop me having a weakness for thrillers and horror movies (is there anything more scary than a little girl in a horror movie? Sinister fitted that brief perfectly – eeek!) nor being a little commercial come Halloween.
Now it might not have escaped regular readers that I’m not one of those bloggers who trots out a festive bake, a week ahead of all the national high days and holidays – the truth behind that being I’m not into blogging for commercial prospective plugging but more for retrospective recording of my foodie escapades.
However, given I have a new job and plenty of time outside of work on my hands, I thought, what the hell, let’s get spooky in time for my readers to copy, should they feel moved to! Let me therefore, without further ado, introduce my Graveyard Chocolate Cake extravaganza! Chocolate haters (do they exist?!) begone – this is not the place for you!

I won’t lie – this is multi-staged and requires two bakes but for a rainy day, indoor activity sort of day it really is fun to create. Fortunately nothing is difficult – if you can make a tray bake and do a teensy bit of rudimentary piping, you’re laughing.

Let’s put Candy Apple to work – her first outing in her new place of residence, which from now on shall be referred to The Apple Chapel (we’ve moved into a converted chapel and its beauty leaves me a little speechless every day). To start, we’re going to make my friend Hevz’s wonderful red velvet cake. I use a tiny bit less sugar (as I didn’t have the full amount in her original recipe) but otherwise, this is my go-to red velvet.
It’s damp and moist and delicious – and more a brick red than a frighteningly fluorescent and artificial tasting one. I use Christmas Red food colouring gel by Sugarflair – do not use a bottle of the liquid colourings you can get in the supermarket – they will render your bake inedible as the amount you need to get the colour brings nothing but a chemical aftertaste no one wants their home bakes to taste of! It’s an unusual method but it works so have a lil faith, and bake!

*Chuckle* – I just had to take a picture of my bowl in the dishwasher as the red gel colour looked appropriately ghoulish, as if it were blood running over the edge ;)Now we leave that to cool and crack on with the headstones – which are, naturally, chocolate orange flavoured. Reason? Erm, well orange seems very Halloweeny, even if the colour doesn’t make an appearance! (Weak JoJo, weak…!). This is my own recipe* and the type of brownie it produces is one which has a bit of body to it and therefore can be sliced and stood upright without support.
You need a relatively high sugar content to produce the crinkly crust on top that gives you the spooky, crumbly headstone effect I was after. Do feel free to make it just chocolate or perhaps add some mint – you may flavour your graveyard however suits you! (*= This really is my own recipe, conjured up by my own grey matter having made many, many different brownies of varying textures. It is, however, impossible to be unique in baking as there’s only so many ways that work to bake a cake.)

Once you have both cakes, the hard work is pretty much over. Again, I created my own thick fudgy frosting for this bake – but do use your favourite if you have another. As this cake is to be taken into work, using cream cheese or meringue buttercreams wouldn’t be wise as it can only be stored at room temperature. Always thinking me, I am 😉

There’s a wonderful chocolate shop near where I live that sells flavoured and coloured chocolate drops – so I used their orange ones to create a twisty-turny path through my graveyard. Do use Smarties, M&Ms, sweeties or candies of your choice – that’s the fun of this bake; let those creative juices flow baby! And reserve any crumbs from in moulding your cakes to add “gravel” to your graves. A small piping bag filled with royal icing is what I used to pipe out cobwebs and RIP on the stones – practice on a tray or piece of baking paper first.
It’s easier than you might think and the shakier the better for Halloween I say! A box of Matchmakers (long crisp chocolate sticks with crunchy bits of orange or mint praline in them, for non-UK readers) snapped off at various heights make a suitably creepy and crooked row of fencing – you could make more frosting and stick them all around the outside it you wish. I’d make half more again if you use my recipe.

You know, I really disliked the kitchen table and chairs out landlord left in our flat – the table is black glass, masculine and rickety and is something I would never have chosen myself. However, I am eating my words (and off cuts of choccie orange brownies) as it works beautifully to set off my seasonally inspired cake creation, especially with the only light coming from some strategically placed candles.
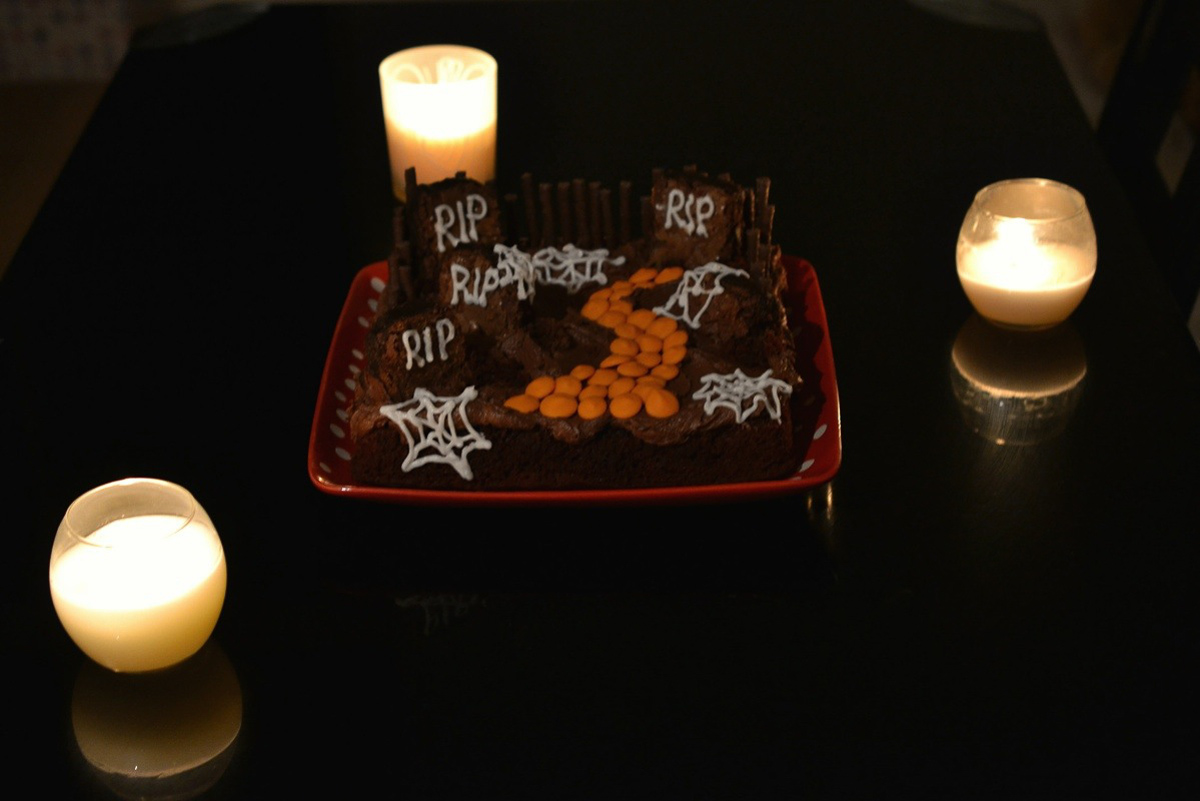
So there we have it – a chocolate lovers dream of a graveyard. I’m sure children would love to decorate as well as eat it as it is so over the top chocolatey. I only used a few pieces to make my headstones but of course, you can add more and perhaps make a more orderly cemetery than mine, with rows of evenly space graves. Mine is a bit more ramshackle and dusty. Hence the cobwebs 😉

Find my recipe just below for the whole cake but do stop by Facebook to say hi to Hevz as she doesn’t have time to maintain a blog but does has a well loved Facebook page where you’ll find lots of her fabulous recipes in her notes. Tell her I sent you 😀

- 180 g plain flour
- 60 g cocoa
- 1 tbsp baking powder level
- 250 g caster sugar
- 100 g soft butter
- 100 ml sour cream
- 150 ml milk
- 1 tbsp vinegar cider or red wine
- 2 large eggs
- 2 tsp vanilla extract
- 1/2 tsp red food colouring gel
- 175 g butter
- 250 g caster sugar
- 1 tsp orange extract or 1 tbsp Cointreau
- 3 large eggs
- 125 g plain flour
- 200 g melted dark chocolate
- 75 g very soft butter
- 175 g caster sugar
- 25 g cocoa
- 1 tsp vanilla extract
- 40 g dark chocolate melted
- Orange sweets or chocolate buttons
- Matchmakers to use as gate posts/fencing
- Instant royal icing
-
Preheat oven to 160°C.
-
Grease and line an 8 inch square baking tin.
-
Sift the dry ingredients together then beat together with the sugar and butter to form a fine crumble mix (it’s odd but trust us!).
-
Whisk all the wet ingredients in a jug then incorporate into the dry mix, stopping as soon as smooth.
-
Pour into your prepared tin and bake for about 30-35 minutes – I would start checking at 25 and look for the top to spring back when prodded and no wet batter when a skewer is inserted into the middle.
-
Cool in the tin for 10 minutes then invert onto a cooling rack to finish cooling (TIP – if domed on baking, press the surface down flat with a clean oven glove GENTLY as soon as out the oven).
-
Save any crumbles of cake from the tin to sprinkle on the cake when you assemble, as if they were pieces of crumbled head stones or a freshly dug grave, mwuahahaha!
-
Preheat oven to 170°C.
-
Grease and line an 8 inch square tin.
-
Beat the butter and sugar until very light and fluffy.
-
Beat in the extract or liquer (I must admit, I used both!).
-
Beat in the eggs with a couple of tbsp of the flour to prevent cuddling.
-
Sift over the rest of the flour and mix in until just combined.
-
Stir in the cooled and melted dark chocolate and mix in thoroughly until no streaks of batter remain
-
Use a spatula to dollop into your prepared tin – it is quite a thick batter, smooth it flat.
-
Bake for 25-30 minutes approximately, start checking at 25 – here you are looking for a sugary, dry, crinkly top which will flake when pressed; a skewer should come out clean for these brownies as they need to be able to stand upright therefore if there is gooey batter on the skewer, give them a few minutes longer.
-
Cool in the tin then put in the fridge for 30 minutes before you turn them out and cut into head stone shapes.
-
You won’t need them all to decorate the cake so serve the rest cut up however you like (you could decorate them if you like too with crosses, cobwebs or RIP).
-
Beat the butter until fluffy with a spatula – I never refrigerate it so it’s very soft indeed in my kitchen.
-
Sift over and stir in the cocoa and sugar.
-
Mix in the vanilla and melted chocolate then switch to a whisk.
-
Beat for several minutes until well amalgamated then very, very slowly, dribble in between 1-3 tbsp of just boiled water, one drop at a time – the idea is to loosen up the frosting and allow you to whisk it until super airy and fluffed up (you may use a stand mixer or electric beaters if you wish!).
-
Dollop onto the cooled cake and swirl to give an uneven ground like appearance.
-
To make the royal icing – use 2-3 tbsp mixed to a thick stiff paste (think of toothpaste) with lemon juice or cold water; put into a small piping bag or plastic food bag and snip off 2-3mm from the end to pipe the patterns of your choice on the graveyard scene.
Adapted from Hevz' Tasty Treats Red Velvet Cake
This post contains affiliate links, meaning I will earn a little commission if you chose to buy items I’ve advertised, helping me to bring you all these recipes for free!
Like this post? Then why not try these related recipes:
-

- Mummified Apple Pie!
-

- Red Velvet Boo Cakes
-

- Frankenstein Minty Rolls
Oh I love this Jo, it’s brilliant! My bpya would go crazy for it! I bet it tasted amazing…I haven’t tried Hevz’s red velvet cake yet but I will soon xxx
Why don’t you make your own Nic – with your gorgeous boys 😀
I think I might just do that 😉 x
Ha ha, BOYS! Darn typos 😀
This cake looks delicious, no style over substance her Jo, I’d love slice with my Halloween cup of tea:-) Quite in keeping with your new home too LOL:-)
Thank you so much Camilla – this was hiding in my spam folder, sorry for not getting back to you sooner! xx
Oh its fab, I am a bit lazy on making themed cakes. I should make more of an attempt, so am seriously envious. Happy Halloween to you..
*sigh* this looks so good! You had me at chocolate…
Yum!
So cool, Jo! Love it ❤️