
It was 5 years ago that I made my dear old Daddums a carpenter’s bench cake for his then 65th birthday. It was, ahem, a *little* basic but isn’t it a law that dads always love anything their little girl makes them, even grown up little girls in their 30s?! Since then, I’d like to think I’ve learnt a thing or two about cake making so I thought I’d go one step further and make a carpenter’s bag instead.
I say bag but it’s really a wooden box to keep their tools in. He’s only gone and turned himself Coeliac (as well as diabetic) in those 5 years but I do like a challenge and it’s not really work when you’re making something for someone you love, is it? Like Daddums always taught me – find something you love and you’ll never work a day in your life. If you too have a Coeliac carpenter with a birthday looming in your life, look no further. I’ve got your back 😉
This is going to be a long and detailed post to cover all the elements of the cake so you can replicate what I did but please take from it what you want. There may just be one part that you want like the recipe for that luscious Italian meringue buttercream or a video of how to cover the board. What you’ll find is:
- A delicious recipe for a Gluten Free Vanilla Sponge
- A scrumptious recipe for Butterscotch Italian Meringue Buttercream
- How to make wood effect chocolate bars (to make an edible, gluten free carpenter’s box with)
- An all singing, all dancing video on how to make a wood grain effect cake board to show off all your hard work with!
- Where to get all the kit and ingredients you will need!
I have to start by crediting the talented cake makers who I took inspiration from for the design for this cake. I went Pinterest crazy for weeks researching how I might design the cake and now you can see that Pinterest board here. You will find links to the few pieces of kit you’ll need if you want to make the cake the same way I did at the end of this post but also don’t forget my Amazon Shop has many of the products or ingredients I use on a regular basis and really trust.
One further thank you has to go to the extremely good people at Juvela (gluten free food makers) who sent me several boxes of their fabulous Gluten Free White Mix which I use for all my Dad’s cake needs and have waxed lyrical about here before.
It’s pricey if not on prescription but honestly, I’m yet to find a gluten free flour mix which produces such a magnificent texture that non-Coeliac’s struggle to identify it as gluten free (you can ask the 30 members of my Dad’s friends and family who attended his party and helped him demolish this cake for confirmation!).
Now let’s get started – I recommend making the wooden cake board ahead of time (along with the tools) as they need to dry out and if stored in airtight boxes, keep indefinitely, making the whole job easier. I hope you enjoy this short video of how I did it!
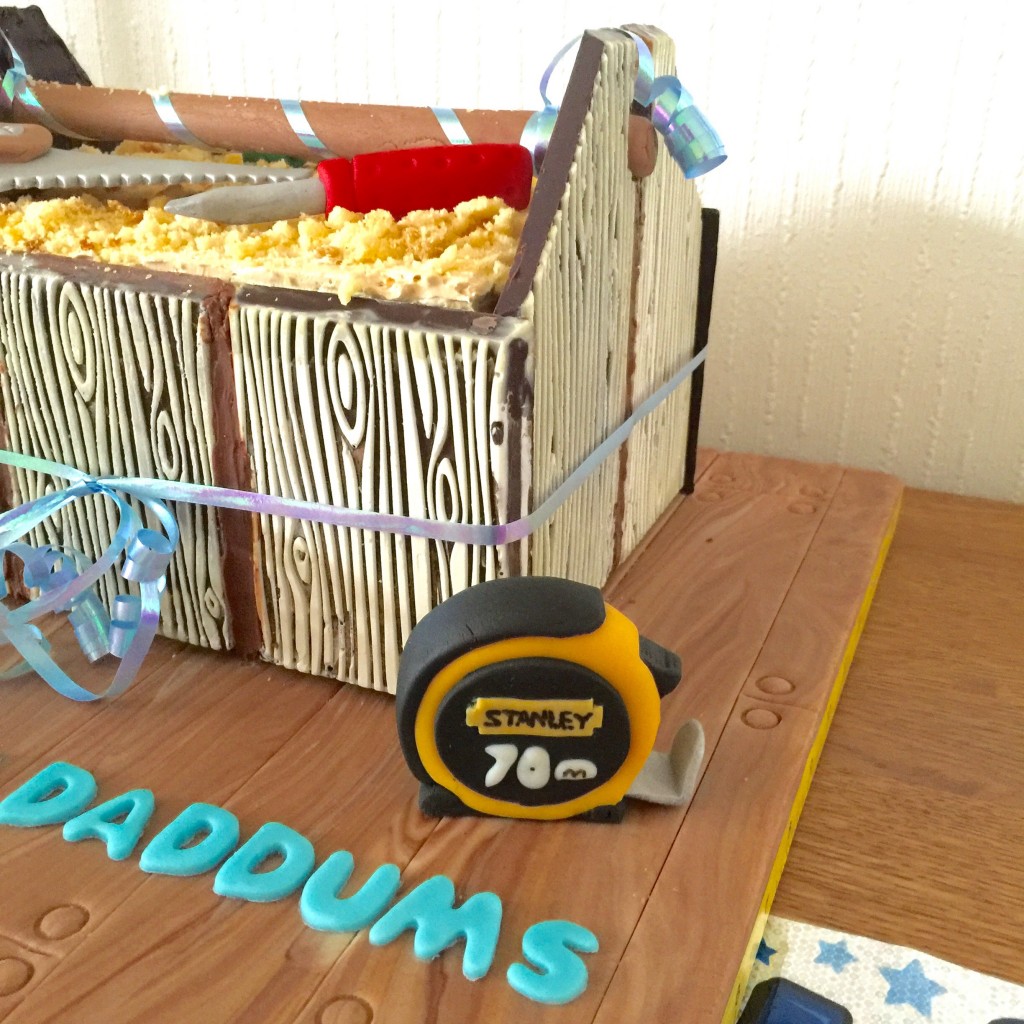
See – isn’t that effective? You’d never think that all those random strands of sugar paste could possibly produce something with such an organic, authentic look, would you? I promise it’s a really easy technique to master and so effective when finished. Let’s take some closer looks at the tools I and gluten free edible sawdust I made!

For the sawdust, it is easy as trimming up your cake, breaking it up and toasting in a low oven to dry them out. They come out like breadcrumbs but nice and sweet. Waste not, want not! Once they’ve sat on the Italian Meringue Buttercream a little while they soften up a little once more and are very palatable to eat.

For the tools, I chose to make two sizes of screwdriver (I wasn’t deft enough to make crossheads so we will have to make do with flatheads!), a wood saw, a tape measure and an electric drill. All I did was Google images of each tool and play around with my sugar paste until I had miniature tools.
I found some sparkly edible silver modelling paste to use for the metallic parts and for the writing on the tape measure, I used a edible food colouring pen
and some writing icing pens you can find in pretty much every supermarket (even the small local ones) I’ve been here in the UK like these.
A set of these Cake Decorating/Sugarcraft Modelling Tools will be the best couple of pounds you ever spend too! A friend gave me a set years ago and they are invaluable for intricate little jobs like these tools.

Moving onto the carpenter’s box itself.
Whilst I like using a little bit of sugar paste to model with, I’ve never been a fan of cake covered in it as I suspect most people just peel it off their slice and chuck it rather than eat it (I know I do) so for my Daddums, I used mostly dark chocolate with a little white to show off the knots in the “wood”.
He’s a big fan of the darkest chocolate but you use whichever you like best. After a bit of digging I found some brilliant silicone moulds which made the wood planks that I joined together to make a box. Plus chocolate is gluten free*! The chocolate work isn’t completely joined around the cake – I left the four corners free to facilitate serving. A nice ribbon like you see in the picture plus the buttercream underneath keep them in place no problem.
(*= you must check the labels of every ingredient if you are especially intolerant to gluten – my Daddums can manage things which aren’t certified gluten free like a lot of chocolate and Bird’s custard powder – which you need for the cake here by the way – but other Coeliacs cannot. Chocolate is likely to be safe as it should naturally be gluten free, it is only when it is made in a factory that processes wheat that you have to be careful and if the contamination is significant, it must tell you in the ingredients list.)
Before the recipes, here’s a quick list of the kit you will need:
- A 12×12 inch square cake board (thick aka “drum”)
- A yellow tape measure washi tape (sticky tape with a design printed on it)
- A mini alphabet and number cookie cutter set
- A a thick and wide straw like these IKEA ones
- Silicone moulds for chocolate “wood” planks – 4 plank
and 3 plank
versions
- A Silverwood multi-size foldaway pan
(Aldi recently did this at a bargain price but it won’t be available forever)
- A set of cheap but brilliant Cake Decorating Sugarcraft Modelling Tools
(couldn’t decorate a cake without these)
- A candy thermometer (for the Italian meringue buttercream) – can’t recommend a Thermapen
enough
- A small kitchen knife to help with crafting the tools
- X kg white sugar paste
to cover the board with – either buy some food colouring gels in yellow
, ivory
and brown
to colour a large block of white or buy the smallest packs of ready-coloured sugarpaste (Renshaw is a good brand and is made in my home town to boot!)
- Small amounts of red, green, silver, black and yellow sugar paste for the tools – a little multipack of primary colours is handy
- A nice ribbon
to tie the box together with
- A piping bag
and a scraper
like this make the chocolate work much easier
- A small round cookie cutter
– I have this set and the smallest one is just perfect
- A sharp knife
(ok, this is *sinfully* expensive but apart from my KitchenAid, this is the one piece of kitchen kit I would save if the house was burning down and my dad bought it for me anyway 🙂

- 1100 g dark chocolate approx
- 60 g white chocolate approx
- Silicone wooden plank moulds see post for link to buy product
- A scraper or flat edge spatula
- A piping bag
-
Start by melting the white chocolate and then add about a tbsp worth to the first plank mould.
-
Scrape it into the grain really well trying to leave no gaps with your bench scraper, straight edge cake scraper or spatula.
-
Scoop any extra into the next mould and repeat until you have filled the 4 plank mould and 3 plank mould. Leave any excess white in a bowl covered to re-melt to make the last 3 planks you will need.
-
When this is set (you can pop it in the fridge for 10 mins if you like) then melt the first 800g of dark chocolate and pour into the moulds. Again, use your scraper to level the chocolate and leave this to set - this will likely take several hours but you can leave it overnight if that is easier.
-
When set, gently unpeel the moulds and then repeat the above procedure to make an additional 2 small planks and a final large one using the remaining chocolate. If you have any dark chocolate left over, pop it into the piping bag, tie the end and leave until you are ready to assemble - this will be the "glue" to stick your planks together. When ready to use it, you can put the bag in a small jug and cover with recently boiled water to re-melt it as long as you don't let water get in the end and haven't snipped the tip off yet!
-
To assemble: lay three of the smaller planks side by side with the longest edges touching. Use a little melted chocolate to fill the gutter you get by placing the planks together - fill it to the top and leave to set. It should be nice and solid. Repeat with the remaining three small planks.
-
For the large planks, place two side by side and join with melted chocolate. Once this is completely set solid, you need to cut the larger end pieces to give the shape you see in the pictures.
-
Mark 10cm up on each of the long sides then 5cm in on the top edge. Use a sharp knife which has been run under hot water and dried, to cut these two corners off. You will be left with a piece of chocolate that resembles the side of a house. You may eat these off cuts!
-
Next take a 2.5cm round cookie cutter (approximate size) and place in a small dish with some very hot water in. Using an oven glove, take the heated up cookie cutter and slowly, gently but firmly push it until you get a little resistance, about 2 cm down from the top of shortest edge you have just created by trimming the edges off. Wiggle it out carefully and heat it up again so that this time, you should be able to push the hot cutter all the way through the chocolate. Eat this spare piece of chocolate too!
-
Now put these pieces aside until ready to assemble the cake.
Finally! Here’s how to assemble the cake:
- Cover the board with the wood-grain effect sugar paste as per the video. Use your washi tape to edge the board.
- Cut the thick straw to 23cm long. Use some excess wood-grain sugar paste to cover it by rolling it out and wrapping around, pinching along the seam and ends to seal. Leave to dry out.
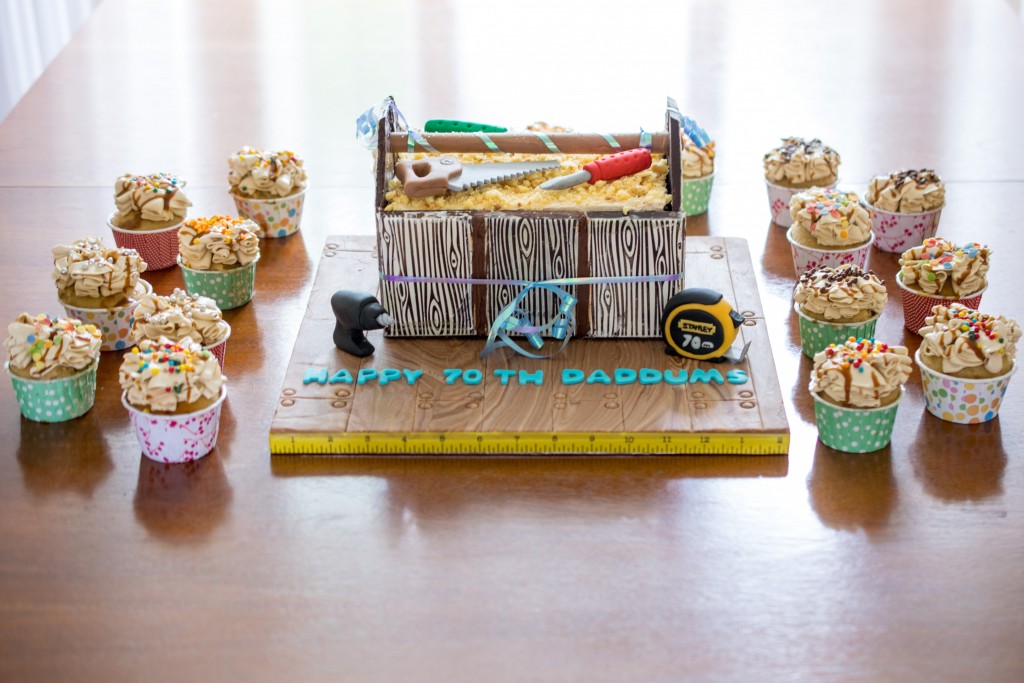
- Roll out a little coloured sugar paste and cut out a Happy Birthday message of your choice – stick to the board with a little bit of water brushed on the back.
- Unwrap your baked cakes and using a little buttercream, secure one to the 8×6 inch thin cake board. Sandwich the cakes with the jam and a nice thick layer of the buttercream. Cover the whole cake with a thin scraping of buttercream (a “crumb coat”) and chill until solid as this is a soft buttercream.
- Take the cake out of the fridge then coat with the remaining buttercream in a nice even layer, using your cake/bench scraper to give nice sharp edges.
- Offer up the wooden planks to the cake – you may need an extra pair of hands to hold them steady as you use your ribbon to bring them all together nice and snuggly. (By not using melted chocolate to join the 4 corners of the bag/box, you simply have to undo the ribbon and let the planks fall to serve – no need to smash them up straight away unless you want to!).
- Wrap a little ribbon around the handle (sugar paste covered straw) and thread through the holes you have made in the end pieces.
- Sprinkle the top with edible sawdust.
- Position your sugar paste tools. (There are more details on how to make these on the post I did for the carpenter’s bench I made 5 years ago. But really, just Google images and play with the sugar paste until you have mini tools which look how you want them too.)
- Place the assembled box on the board with the help of a large flat spatula and you are done!
Right, that’s quite enough. I hope you enjoyed this post and please rest assured, we’ll be back to normal with short posts again from the next post. Honestly – how do cake decorators write succinct blogs?! But it’s not every day your Daddums turns 70 so I hope you can indulge me a little with this loquacious post 😀
This post contains affiliate links, meaning I will earn a little commission if you chose to buy items I’ve advertised, helping me to bring you all these recipes for free!
Like this? Then take a look at these related posts:
-

- The Original Carpenter’s Cake
-

- GF Orange & Vanilla Bundlettes
-

- GF Mini Dundee Cakes
You have a VERY lucky Daddums. Magnificent. X
Aw thank you my lovely Moo X
An impressive cake for your father – such a labor of love! Stunning.
Thanks Meeta – he really loved it. A crying shame I didn’t press record when trying to video his little speech and cutting of the cake!
I can’t imagine how much time and effort you put into this cake. It looks really amazing. Congratulations!!
Thanks Silvia – I researched it over a period of weeks and did the sugar paste elements and chocolate work well in advance of the day. It was worth it to see how happy my dad (and family) were with it!
That is AMAZING! Almost too impressive to eat. Happy Birthday to your Dad 🙂
Aw we managed somehow 😉 I’d have been devastated if it wasn’t eaten lol!
What a cute cake!!!!
Your cake is GORGEOUS! Such intricate work – Such a sweet gesture for your Daddums. And I so enjoyed that video on how to make a wood grain cake board too!
Oh thanks for reading and watching the video Shashi!