

When I stumbled upon a recipe for a preserve called Ambrosia Jam, I just knew I had to make it. The name was just so tempting and the ingredients were full of promise.
It was a surprise to find a recipe for pineapple, apricot and orange jam in my old Women’s Institute Preserves & Pickles book as it is way more exotic than anything else in there! Full of tropical fruity flavours, this luminescent orange coloured jam will whisk you away to foreign holidays with a cocktail in your hand and the sun on your shoulders. Perfect for the rubbish summer we’re having in the UK this year.
For all it’s exoticism, this jam is quite frugal to make as you may expect from a book written in 1978. The original advices using a can of crushed pineapple and dried apricots soaked overnight – did you know that dried apricots soak up so much water they return to their original size after a mere 12 hours soaking in cold water? Bananas! I was quite surprised to see these glowing pale but plumptious apricots bobbing in my jug when I came downstairs the first time I tried this, lol.

Jam making is such a summery activity. Although more usual to use excess ripe fruit in the height of it’s season than dried and canned fruit, the good thing about this particular jam is you can whip up a batch on the coldest January day with ingredients from your store cupboard. Do read my Strawberry, Lime & Vanilla Jam recipe post for an explanation of the science of jam making.
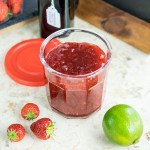
Bing Cherry Jam
Take a peak at my Bing Cherry Jam for a very relaxed method to make it for when you feel comfortable with jam making. I’ve made jams with and without a thermometer and in the end, I think it comes down to personal preference which you go for.
It can be an extra reassurance if you are new to jam making though and I wholeheartedly recommend a trustworthy thermometer like a Thermapen which will come in handy for many other uses than jam – soft set fudge anyone?

Once you’ve filled a few jars with this glowing amber Ambrosia Jam then a few suggestions would be to replace the raspberry or cherry jam in a Bakewell and make a tropical version instead. Or just fill my Vanilla Yogurt Cake or a traditional Victoria Sponge with it. Or ooo, pimp up your Custardy Jam Muffins with a spoonful of sunshine to brighten up your breakfast. And one last thing – a couple of tablespoons of Malibu, a white coconut rum, stirred in to the fully cooked jam will only be a very, very good thing 😀

- 500 g dried apricots soaked in lots of cold water for upto 24 hours
- 350 g crushed pineapple from a can* drained
- Zest and juice of an orange
- Zest and juice of a lemon
- Caster sugar
-
Make sure you soak your apricots a good 12-24 hours before using and remember, they will swell up to pretty much their original volume so use a very large bowl or jug to do so. Drain well.
-
If using canned crushed pineapple drain it through a fine sieve. If using fresh pineapple, chop into chunks and together with the apricots, chop them extremely finely with a very sharp knife until no large or sharp pieces remain. It is much quicker to do this by pulsing in a food processor but I have done it by hand. If using the FP then pulse it and stop before it turns into a purée.
-
Scrape the finely chopped pineapple and apricot into a large bowl then add zest and juice of the orange and lemon. If you have a digital scale it is helpful to zero the bowl on the scale so you can weigh all the fruit easily.
-
Once you know the weight of the fruit, scrape it all into a very large saucepan or preserving pan then weigh out an equivalent amount of sugar. You can reduce this to 70% of the weight of the fruit and it will still set if you prefer.
-
Stir the sugar and fruit well then once the sugar has dissolved, turn the heat up to high and bring the pan of fruit to a rolling boil. Do not leave it's side. Stir frequently to ensure none sticks and burns on the bottom of the pan.
-
Keep at the rolling boil stage, adjusting the temperature of your hob as needed. Keep on stirring and what you are looking for is the fruit to evaporate off enough liquid that the mixture becomes heavy on your spoon - about 20-25 minutes for this liquid to begin with jam. Look for "flakes" forming i.e. when you lift your spatula out, the jam will fall off in flakes back into the pan, rather than a steady liquid stream. Another good test is to take the jam off the heat, place a teaspoonful onto a cold plate and leave for a few minutes then push your finger through it - if it ripples and wrinkles, mostly holding this shape, then it is ready. A final test is to take the temperature of the jam and if it reaches 105°C it is ready.
-
Once the setting point has been achieved, ladle your jam into sterilised** jars and seal immediately. Leave to cool completely before using.
*= make sure to drain the pineapple if using a can. If not, you can substitute for 350g fresh pineapple which you can pulsed in a food processor until it makes a fine mulch with no large or sharp pieces remaining.
**= I sterilise my jars by putting them through the dishwasher on the hot cycle and using whilst still warm.
Adapted from The Women's Institute Book of Preserves & Pickles
This post contains affiliate links, meaning I will earn a little commission if you chose to buy items I’ve advertised, helping me to bring you all these recipes for free!
Like this? Then why not try these related recipes:
-
- Strawberry Lime & Vanilla Jam
-

- Microwave Lemon Curd
-

- Bing Cherry Jam
What an interesting recipe, odd to see a jam recipe that is an all year round affair rather than a preserve what you have activity. It is full on preserving season here, plum chutney up next for me 😀
I know, it’s a little bit different but it really works. There are quite a few recipes from back in the day for dried apricot jam, presumably from when you simply couldn’t get them fresh or the cost would have been too high to “waste” fresh ones in a jam. I bet you’re really busy Brian right now – and if it’s 31 degrees in Sheffield today god help you in Hungary!
I had no idea that apricots plumped themselves back up like that from dried. That in itself is a handy little bit of information to know. I have never heard of ambrosia jam, but I am already loving it. Pantry items and bingo a gorgeous looking jam.
It was a real shock to me to see how they puffed up too Sara!
Lovely combination of fruits for a jam and I like that it’s one you can make even in the depths of winter when few fresh fruits abound!
Exactly! A handy little recipe for the winter months 🙂
I love the colors so much, I bet these taste amazing. 🙂
It’s really lovely Silvia, tropical and fruity 😀
Great mix of flavors, I know this would taste wonderful on my morning toast! I love the name…Ambrosia! 🙂
It’s cute isn’t it? I love the name too. And yes, it’s wonderful on toast at breakfast time 😀
please put the measurements into cups, pounds, ounces or Tablespoons… loy of us dont know metric measures
Hi Arlene, thanks for stopping by. I use cups myself for selected things but the majority of my recipes are in the UK and we don’t use cups here. For jam making, you really do need to be more precise so the ratio of fruit:sugar is correct so I’d really encourage you getting a digital scale if you would like to try this jam. I’m afraid this one recipe wouldn’t be desperately accurate if you used cups!
500 g = 17.64 oz
350 g = 12.34 oz
105C = 221F
I’ve never heard of ambrosia jam, it sounds so good and the pics are just amazing! I’m going to have to try this soon! Thank you for posting!
You are most welcome Christine. Isn’t it lovely? I hadn’t heard of it but I suspect it is an old WI recipe. Thank you for your kind words x
sounds like a lovely recipe, could you please tell me how much this recipe makes Thank you
Hi Pat – thanks for commenting and I’m really glad you like the look of the jam. You will yield approximately 750ml of jam from this recipe x