

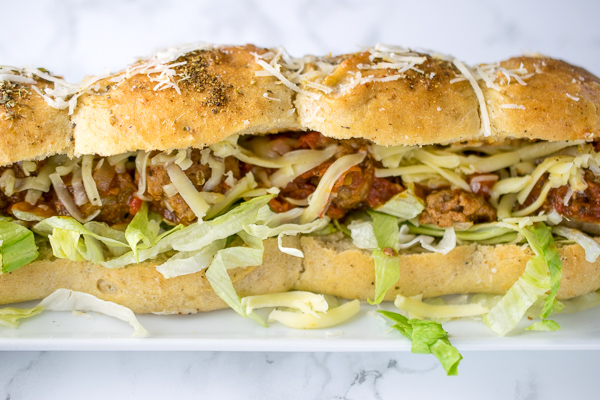
Soft and squishy, cheesy and herby – that’s right, we’re talking Italian Herbs & Cheese Subway Rolls. Homemade ones!
The secret to getting the softest breads is being willing to sacrifice a tea towel to the hot buttered, cheesy and herby rolls. It was a tip I picked up from Dan Lepard and his soft white baps (how childish am I that the mention of soft baps makes me chuckle?!) and it really works. It softens the crust as the steam from the freshly baked rolls can’t escape.
Which is crucial to get the texture of that high street sandwich shop, Subway. I really do recommend you try my recipe for Italian Seasoning if you’re making these rolls, it’s just so flavourful. And if you want tips on how to shape baguettes or subs so they aren’t lumpy bumpy then check out this post which has videos of me shaping batards – just make your subs a little thinner and you’re laughing.
Fill with whatever sandwich fillings you like – meatballs and cheese are an obvious choice but I’d love to hear how you like your subs!

- 200 g bread flour
- 2 tsp dried yeast
- 1/2 tsp sea salt
- 1 tsp sugar
- 2 tbsp olive oil
- 1 tsp Italian seasoning*
- 2 tbsp parmesan cheese
- 120 ml warm water
- 1 tbsp very soft butter
- Extra Italian seasoning and parmesan to sprinkle
-
Mix all the ingredients for the bread bar the water together then pour in the water and start to bring the dough together - it should be soft and shaggy.
-
Knead in a stand mixer on medium speed for up to 10 minutes until the gluten is very well developed and the dough is silky soft, not sticky.
-
Grease a bowl and place the dough in, covering with cling and leaving to prove until doubled in size. This barely takes 40 minutes thanks to the extra yeast and warm water.
-
Gently deflate the dough and divide into two. Form into a very rough sausage shape and leave for 5 minutes on the work surface. It makes it easier to roll out the baguette shapes by allowing the dough to relax a wee while.
-
Preheat the oven to 220˚C with the shelf you are set to bake on low down in the oven. Place an oven proof dish of water underneath it to create a steamy environment.
-
Take one of the pieces of dough and place it in front of you with the long side towards you. Place your hands in the middle and with firm pressure roll out moving your hands to the ends once or twice only to produce a long, thin baguette shape of even thickness. If you have pointy ends, tuck under and transfer to a baking sheet. Repeat with the second piece of dough giving them about 4 inches between them.
-
Cover with a lightly greased piece of clingfilm leaving room to grow and leave another approx 40 minutes until they are doubled in size.
-
Remove the cling and do 3 deep slashes with a sharp knife or lame to give that Subway sub characteristic appearance. If you're not confident, you don't have to for this recipe as it's so soft it will rise unimpeded on baking.
-
Place on the low down oven shelf, immediately turning the oven down to 180˚C - *beware* the release of steam from the oven when you open it and stand back.
-
Bake for approx 20-25 minutes when they will be well risen but very pale golden brown only. They will be soft to press but not doughy.
-
Now here's the crucial bit - you must remove them from the oven, use a long spatula to transfer the subs to an old tea towel as they will be super soft and delicate, then immediately brush all over the top with the butter. You may not need it all. Sprinkle with the extra Italian seasoning and parmesan, place a piece of kitchen roll over them then wrap up in the tea towel and leave them to cool completely. This is essential to making the subs super duper soft so don't skip this last step!
*= I have a recipe for homemade Italian Seasoning here which I highly recommend you using but if not, you can pick up various blends of Italian herbs and spices at the supermarket.
This post contains affiliate links, meaning I will earn a little commission if you chose to buy items I’ve advertised, helping me to bring you all these recipes for free! Don’t forget to stop by my Amazon Shop too to see what kitchen kit I use everyday.
Like this post? Then why not try these related recipes:
-

- Homemade Roti
-

- Homemade Frozen Pizzas
-
- Garlic & Coriander Naans
Before I went gluten free I used to eat Italian herb bread from Subway ALL the time. I love your rendition, it’s awesome!
They really need to make a gluten free sub for you Charla. In saying this, I’m surprised they don’t offer one. And thanks 🙂
This bread sounds amazing. I love a good sandwich roll! I’ve never tried that tea towel trick, but I’m going to now!
It’s a great trick – it really softens up the bread a treat 🙂
Nothing better than homemade bread. I can smell it from here. Like the fresh herbs/
Thanks Peter, you’re not wrong about fresh homemade bread 🙂
Looks so delicious!! I am soo going to try this at hime
Thanks Swayam, I hope you like it!
This looks divine! Perfect for filled buns or eaten with hearty warm dishes 🙂
Thanks Evan – we are having this again for dinner tonight, it’s addictive 😉